Visual Content Previews with Vue Storefront 2
Published · 8 min read
In the past couple of articles, I've walked through integrating a headless CMS and also implementing content personalisation with Vue Storefront 2.
In this article, we're going to take things even further and learn how to integrate Vue Storefront 2 with LexasCMS's visual content previews.
Content editors are often left guessing at how content will appear once published. Visual previews are instrumental in removing the need for this guesswork and give content editors the confidence that they need to work efficiently.
In addition to this, LexasCMS's visual previews integrate deeply with its personalisation and scheduling features, enabling content editors to see exactly how any (past, present or future) content will appear through the eyes of specific visitors.
Awesome right? Let's take a look at how it works 👇.
Tutorial
Just like last time, we're going to be using the store which you created in the previous tutorials as a starting point. If you haven't completed these, don't worry as I'll also provide some instructions to get you caught up 🙂.
Pre-requisites
As with the previous tutorials, before getting started it's recommended that you have the following:
- Basic knowledge of Vue.js and Nuxt.js
- Node.js v14 or higher installed
- Yarn installed
- A LexasCMS account - Click here to start a free trial
Step 0: Getting caught up
Note: If you've already completed the previous tutorials, feel free to skip this section.
For those of you you haven't, simply follow the steps below to catch up.
Step 0.1: Create a new space on LexasCMS
First you'll need to create a new space in LexasCMS which uses the E-commerce Tutorial (Vue Storefront) template.
To do this, simply follow Step 1 of the first tutorial which you can find here.
Step 0.2: Clone source code for previous tutorial
After creating your space, you can clone the final source code for the previous tutorial by running the following command:
git clone --branch part-2-personalisation https://github.com/LexasCMS/tutorial-vuestorefront2.git
Step 0.3: Install project dependencies
Once you've cloned the source code, navigate into your project directory and install the projects dependencies using the commands below:
cd tutorial-vuestorefront2
yarn install
Step 0.4: Configure your space ID
Open the middleware.config.js file within your code editor and replace process.env.LEXASCMS_SPACE_ID within the lexascms configuration with your actual space ID.
Note: You can find your space ID by navigating into the Settings > General section of your space control panel.
 module.exports = {
   integrations: {
     // ...

     lexascms: {
       location: 'vsf-lexascms/server',
       configuration: {
-        spaceId: process.env.LEXASCMS_SPACE_ID
+        spaceId: 'YOUR_SPACE_ID'
       }
     }
   }
 };
Step 0.5: Start development server
After your projects dependencies are installed, start your development server using the command shown below:
yarn dev
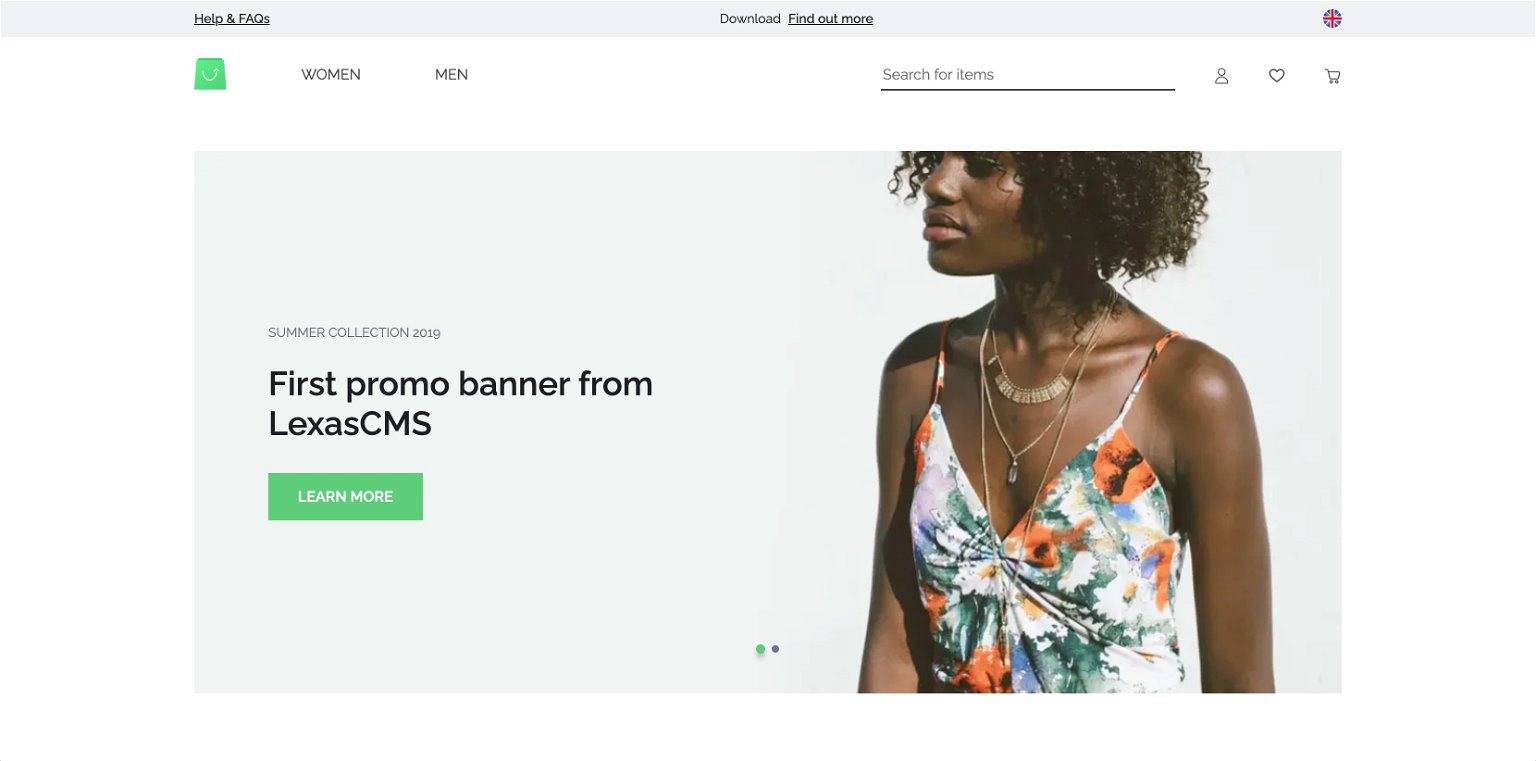
Once your development server is up and running, navigate to http://localhost:3000/ in your web browser and you should see something like the below screenshot.
0.6: Setup personalised content (optional)
While optional, we recommend completing steps 1-4 of the previous tutorial.
In addition to allowing you to gain an understanding of LexasCMS's personalisation features, it will also enable you to experience the full benefits of the visual preview tool later on.
Step 1: Configure your preview URL
The first thing we need to do is configure a preview URL which LexasCMS can use to load your project within its visual preview tool.
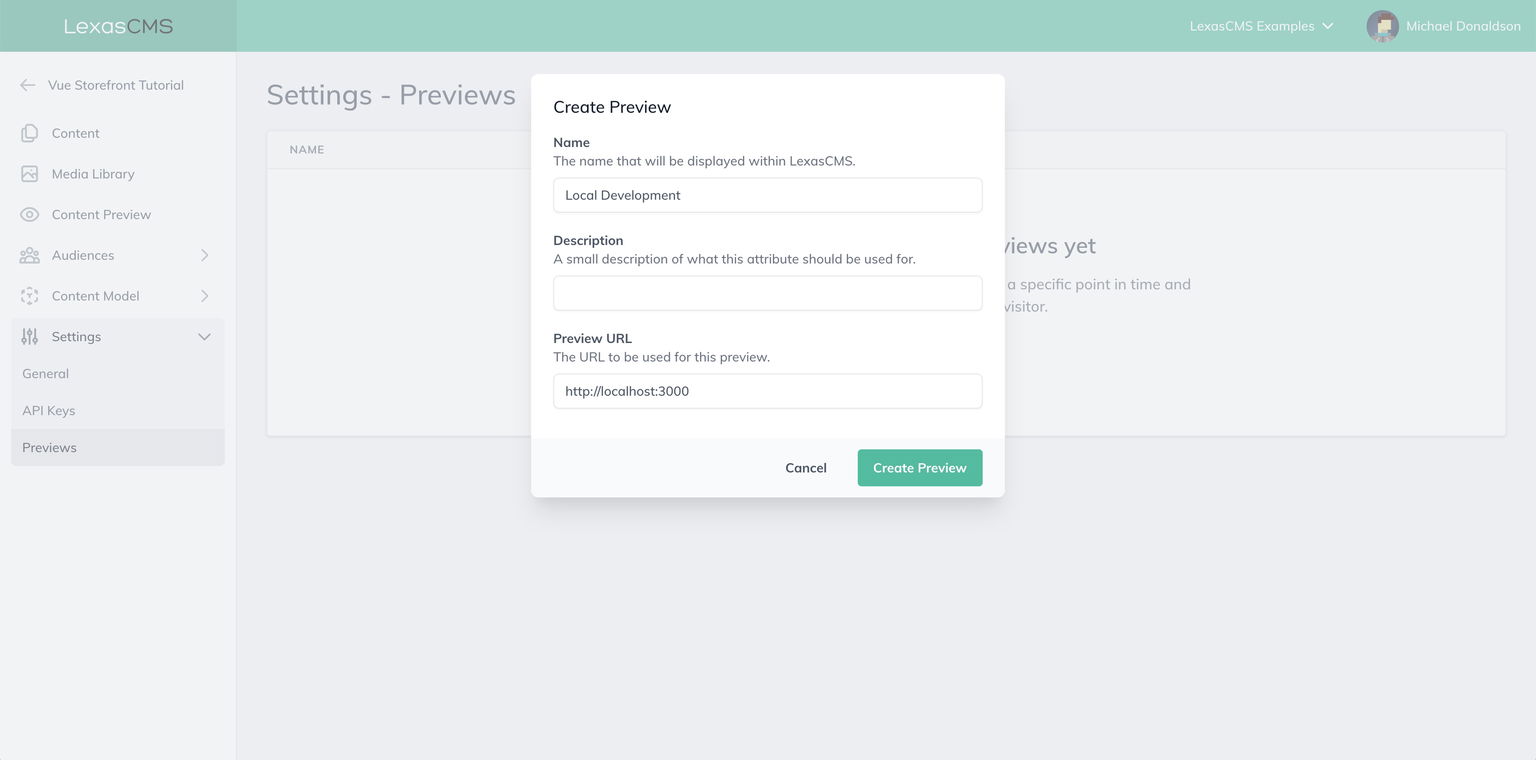
To do this, navigate to the Settings > Previews section of your space, and click on the Create Preview button.
Create a preview with the following attributes:
Name: Local Development
Preview URL: http://localhost:3000
Step 2: Create an API key
When retrieving content previews from LexasCMS's Content Delivery API, you must authenticate your requests by providing an API key.
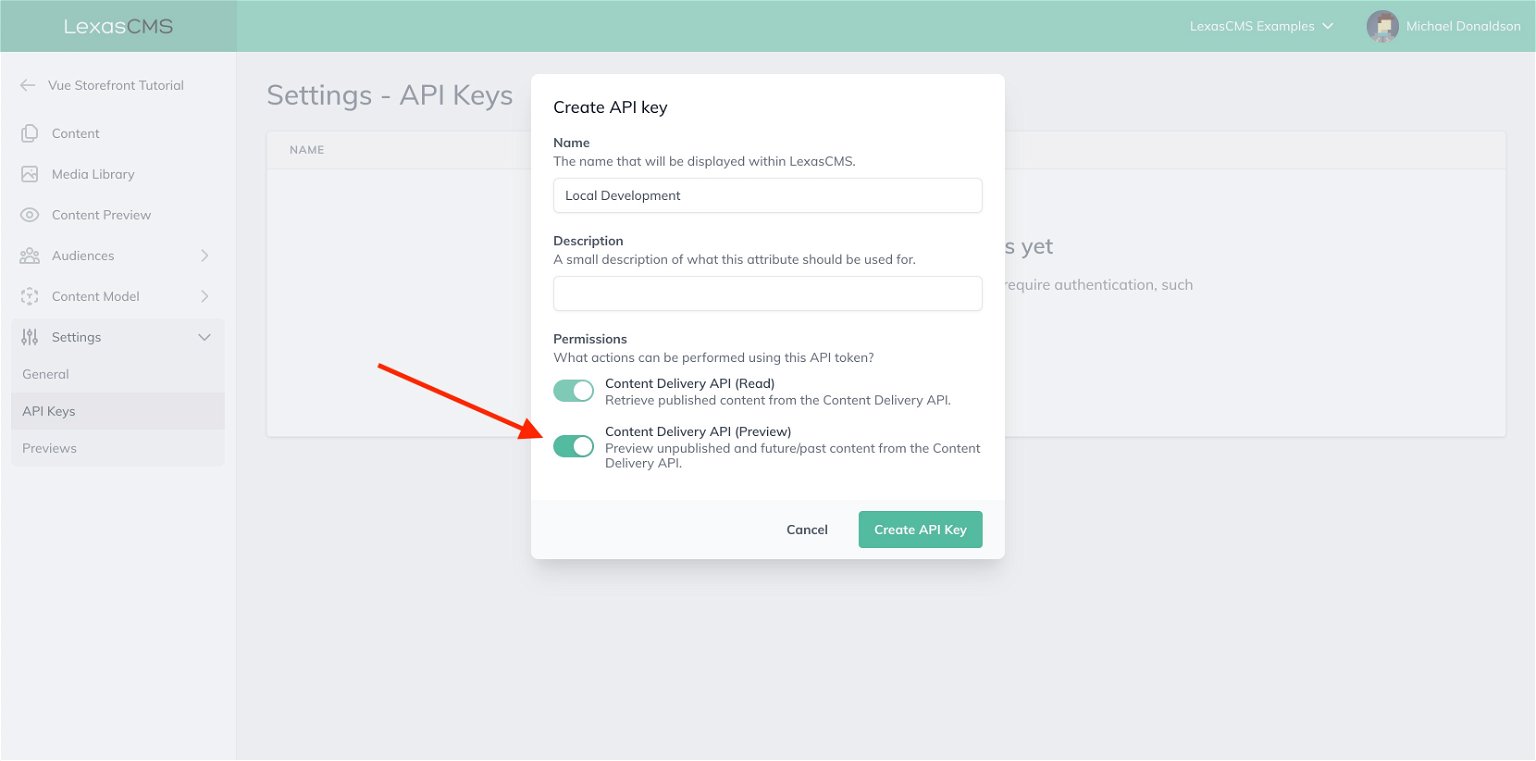
Navigate to the Settings > API Keys section of you space, and click on the Create an API Key button.
Create a new API key named Local Development, being sure to enable the Content Delivery API (Preview) permission as shown in the screenshot below.
Once the API key has been created, take note of the generated token, as you'll need it later.
Step 3: Install LexasCMS code snippet
In order for LexasCMS's visual preview tool to function correctly, you must install a small code snippet.
This code snippet must be embedded on every page and allows your project to communicate with LexasCMS's visual preview tool.
To install the code snippet, make the following changes to your projects nuxt.config.js file:
 // ...

 export default {
   // ...

   head: {
     // ...

-    script: []
+    script: [
+      {
+        hid: 'lexascms',
+        defer: true,
+        innerHTML: '(function(e,t){void 0!==e.addEventListener&&e.addEventListener("load",function(){var e=t.getElementsByTagName("script")[0],n=t.createElement("script");n.type="text/javascript",n.async=!0,n.src="https://static.lexascms.com/lexascms.js",e.parentNode.insertBefore(n,e)},!1)})(window,document)'
+      }
+    ],
+    __dangerouslyDisableSanitizersByTagID: {
+      lexascms: ['innerHTML']
+    }
   }

   // ...
}
Step 4: Configure API key
Next, in your projects middleware.config.js file, configure your API key by adding the apiKey property to your lexascms configuration as follows:
Note: Be sure to replace YOUR_API_KEY_TOKEN with the generated token for the API key which you created in step 2.
 module.exports = {
   integrations: {
     // ...

     lexascms: {
       location: 'vsf-lexascms/server',
       configuration: {
-        spaceId: '...'
+        spaceId: '...',
+.       apiKey: 'YOUR_API_KEY_TOKEN'
       }
     }
   }
 };
Step 5: Update homepage source code
When LexasCMS loads your project within it's visual preview tool, it provides a pre-configured request context via the lexascmsRequestContext query parameter.
If you followed the previous tutorial, you'll remember that we used the request context to set the values of our audience attributes when making a request to the Content Delivery API.
When the lexascmsRequestContext query parameter is present, we should pass its value as the request context for all requests to LexasCMS, instead of defining our own.
As an example of how to do this, open the pages/Home.vue file and update the setup function to as follows:
 // ...

 setup(_, context) {
   // ...

   const { content: promoBanners, search } = useContent();

   onSSR(async () => {
+    let requestContext;
+    const { lexascmsRequestContext, localTemp } = context.root.$route.query;
+    if (lexascmsRequestContext !== undefined) {
+      requestContext = lexascmsRequestContext;
+    } else {
+      requestContext = {
+        audienceAttributes: {
+          localTemperature: localTemp ? parseInt(localTemp, 10) : null
+        }
+      };
+    }
+
     await search({
       type: 'collection',
       contentType: 'promoBanner',
       params: {
         include: 'backgroundImage'
       },
-      context: {
-        audienceAttributes: {
-          localTemperature: context.root.$route.query.localTemp ? parseInt(context.root.$route.query.localTemp, 10) : null
-        }
-      }
+      context: requestContext
     });
   });

   // ...
 },

 // ...
As you can see, this change will first check for the existence of the lexascmsRequestContext query parameter before attempting to build its own request context.
Step 6: Previews in action
After saving your changes, restart your development server and head back into LexasCMS. Navigate to the Content Preview section of your space.
You should see your project appear in the main visual preview panel.
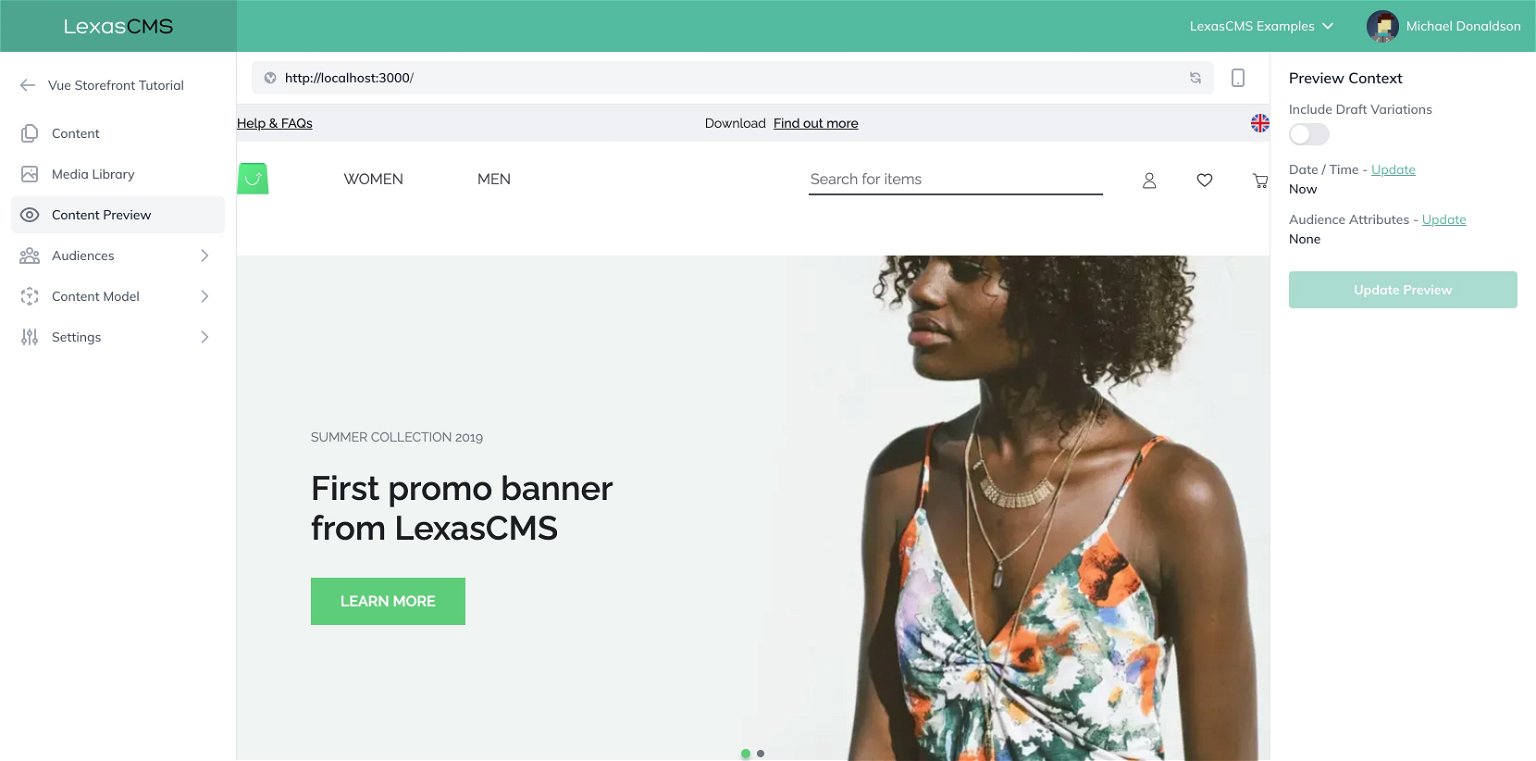
To the right of the preview, there will be a sidebar which allows you to control the context of the preview.
Just like we did in the previous tutorial, let's see what our store looks like when being viewed by a customer whose local temperature is 5°C.
Click the Update link next to the Audience Attributes heading in the preview context sidebar to reveal the Update Audience Attributes modal.
From the modal, click the Add Attribute button, select the Local Temperature attribute and set it's value to 5.
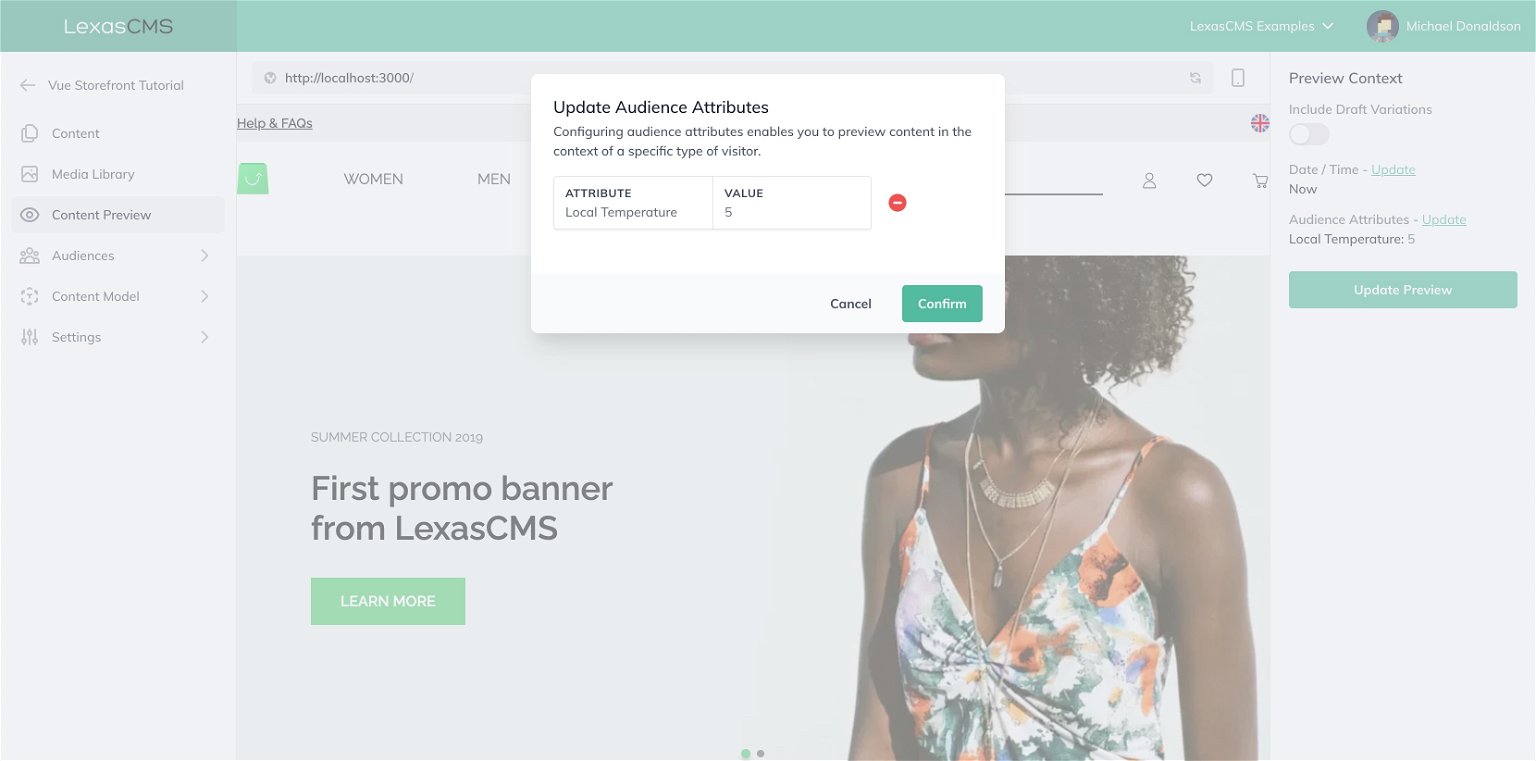
Click on the Confirm button, followed by the Update Preview button in the preview context sidebar. This will apply your changes and reload the preview in the specified context.
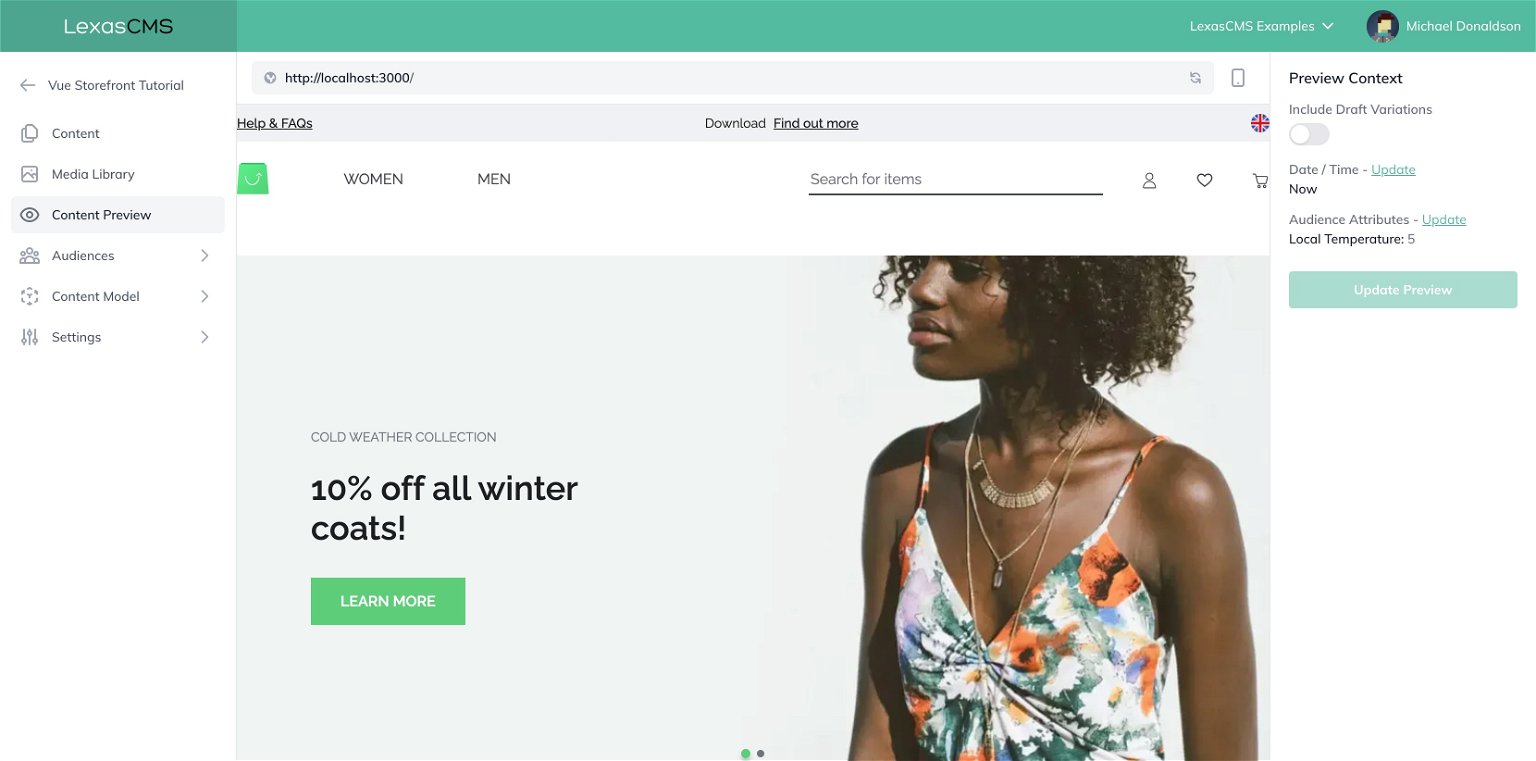
You should now see that the preview has updated, and that the content from the Cold Climate variation which we created in the previous tutorial is being displayed.
What did I say, awesome right? ✨
Live demo and GitHub repo
A live demo of this tutorial as well as its source code can be found using the links below:
Live demo: https://lexascms-tutorial-vuestorefront2.vercel.app
Source code: https://github.com/LexasCMS/tutorial-vuestorefront2/tree/part-3-visual-previews
Summary
We'll definitely be writing more about Vue Storefront in the future, however this marks the end of our Vue Storefront 2 tutorial series.
To recap, in this series of tutorials we've covered the following:
- Integrating a headless CMS
- Personalised Content
- Visual Content Previews (this article)
These tutorials have demonstrated not only how simple it is to integrate LexasCMS with Vue Storefront 2, but also the additional benefits that it brings to your e-commerce store.
Did you find this series of tutorials helpful? Tweet at us to let us know!
Want to see more articles like this?
Subscribe to our mailing list to be kept up to date with our latest content.
Michael Donaldson


