Creating a personalised e-commerce store using Snipcart and Next.js
Published · 21 min read
This article was originally published on the Snipcart blog.
UPDATE: Since this article was originally published, we've released our first third party integration for Magento 2, which you can read about here.
Want to skip all of the pre-amble? Click here to jump straight to the tutorial.
Why create a new headless CMS?
Hey 👋, I’m Mike, one of LexasCMS’s co-founders.
This is probably one of the first questions people ask when you tell them that you’ve created another new headless CMS for personalization. Give me a moment to explain, and you’ll see that it’s worth your time. 😉
There’s somewhat of a running joke in the development community that almost every developer will decide to build a custom CMS at some point in their career. In fact, back in the mid/late 2000s, pretty much every web agency actually had its own bespoke CMS.
Fast forward to 2021, and the way people consume content has changed radically. Users not only expect content to be accessible from all of their various platforms and devices, but they also expect it to be consistent.
As a result, the past decade has seen an explosion of new headless CMSes being launched to meet the evolving demands of the world's digital ecosystem.
So to take it back to the original question, why did we create LexasCMS?
Well, while it’s true that there are a stunningly large number of headless CMSes to choose from, there are none that really hit the sweet spot when it comes to e-commerce.
Important features–such as personalization, scheduling, and visual previews–are often either missing, not flexible enough, or require too much custom integration work.
By focusing on e-commerce, we can ensure that LexasCMS provides the tools and features that storefront owners need to drive sales and run successful e-commerce businesses.
What is LexasCMS?
LexasCMS is an e-commerce focused headless CMS bootstrapped and launched by myself and fellow co-founder David Bond in June 2020.
I’ve known David almost my entire life. After going through school and college together, we began working as freelancers in 2010, working on projects of all shapes and sizes.
Naturally, from the beginning, we had our own bespoke CMS (who didn’t, right?), which we would use as the base for most of our client projects. Over time, we continued to develop new features, fix bugs, and at one point, even began the process of packaging it for commercial purposes.
Ultimately, we decided that with the headless CMS's rise, it probably wasn’t the right direction. Instead, we opted to use what we’d learned over the best part of a decade to create what would eventually become LexasCMS.
During the initial planning for LexasCMS, we were conscious that we didn’t want to create “yet another headless CMS”. It needed to provide specific value which couldn’t be found in existing solutions.
Around this time, we decided to focus on e-commerce and providing the specific features required by modern online businesses.
👥 Content Personalization - Personalization is one of the biggest features of modern e-commerce websites. With LexasCMS, editors can create multiple variations of their content and then target them at specific audiences based on their individual characteristics.
🗓 Content Planning / Scheduling - Many e-commerce businesses plan their content weeks or even months in advance. LexasCMS allows you to input precisely how your content should change over time and then handles the rest for you. No more babysitting late-night content deploys. 🙌
👁 Visual Previews - Navigate around your website in the context of specific visitors. You can even control the date/time of the preview context to see how it would look for them in the past or future.
⚙️ Third-Party Integrations (Coming Soon) - LexasCMS will soon be able to link product and category data from your e-commerce platform directly with your CMS content. This will make it painless to implement features such as personalized product recommendations.
What’s this post going to be about?
In this post, I will show you how to create a personalized e-commerce store using LexasCMS, Snipcart, and Next.js. I’ll also show you how to set up visual previews so that you can see how your website appears through the eyes of specific visitors.
Before we get into the tutorial itself, I want to take a moment to explain what we mean by personalization and how LexasCMS makes it easier.
Many years ago, personalization was as simple as including a customer’s name within a marketing email. Nowadays, requirements are a lot more in-depth and can refer to anything from displaying a customer’s name all the way through to customizing the contents of an entire webpage.
Personalization is usually based on known information about the current customer. This information could be anything, but common examples include basic profile data, previous browsing/purchase history, their current location, or even the weather in their current location.
Before LexasCMS, if you wanted to personalize your CMS content, you needed the help of a third-party personalization platform. This platform would be used to determine which audiences a customer was in, and then developers would use that information to manually query for the correct content from your CMS.
The problem with this approach is that it places a lot of burden on the developer to calculate and retrieve the correct content. Additionally, using two separate services creates a disconnect between the content management and personalization configuration, which in some cases can also limit the freedom for content editors to experiment. Content editors must also learn and jump between two separate applications, adding further friction to the content management process.
LexasCMS not only removes the need for an additional third-party platform but also removes almost all of the personalization logic from your application. Simply ask LexasCMS for a piece of content, describe the customer who is making the request, and it will automatically send back the most relevant variation of that content.
This is possible because LexasCMS holds all of the audience and personalization configuration. Content editors can control which variations of content should be delivered to specific audiences, enabling LexasCMS’s Content Delivery API to automatically calculate which content is most relevant for any request.
Well! With all that out of the way, let’s move on to the tutorial! 🤓
❗️ Fair warning: This is a pretty long tutorial, so if you just want to see the final result or the source code, feel free to skip to the end.
Creating a personalized e-commerce store with LexasCMS, Snipcart & Next.js
As mentioned earlier, we’re going to use Next.js for our example e-commerce store, but why Next.js?
Editor note: We have a great video with our friend Colby Fayock explaining what is Next.js here.
The main reason is that Next.js makes it incredibly simple to switch between Server-Side Rendering (SSR) and Static Site Generation (SSG) on a per-route basis.
Since we’re going to be personalizing some of the pages on our store, these routes will need to be rendered on the server so that the content can be tailored based on the current visitor’s characteristics.
On the flip side, routes that don’t typically need to be personalized–such as product pages–can be statically generated to improve performance.
Pre-requisites
Before getting started with the tutorial, it is recommended that you have the following:
- Basic knowledge of React and Next.js
- Node.js v12 or higher installed
- Yarn installed
- A LexasCMS account - Click here to start a free trial.
- A Snipcart account - Click here to create a free account.
Step 1: Create a new space on LexasCMS
Start by signing into your account and then either creating a new organization or navigating into an existing one.
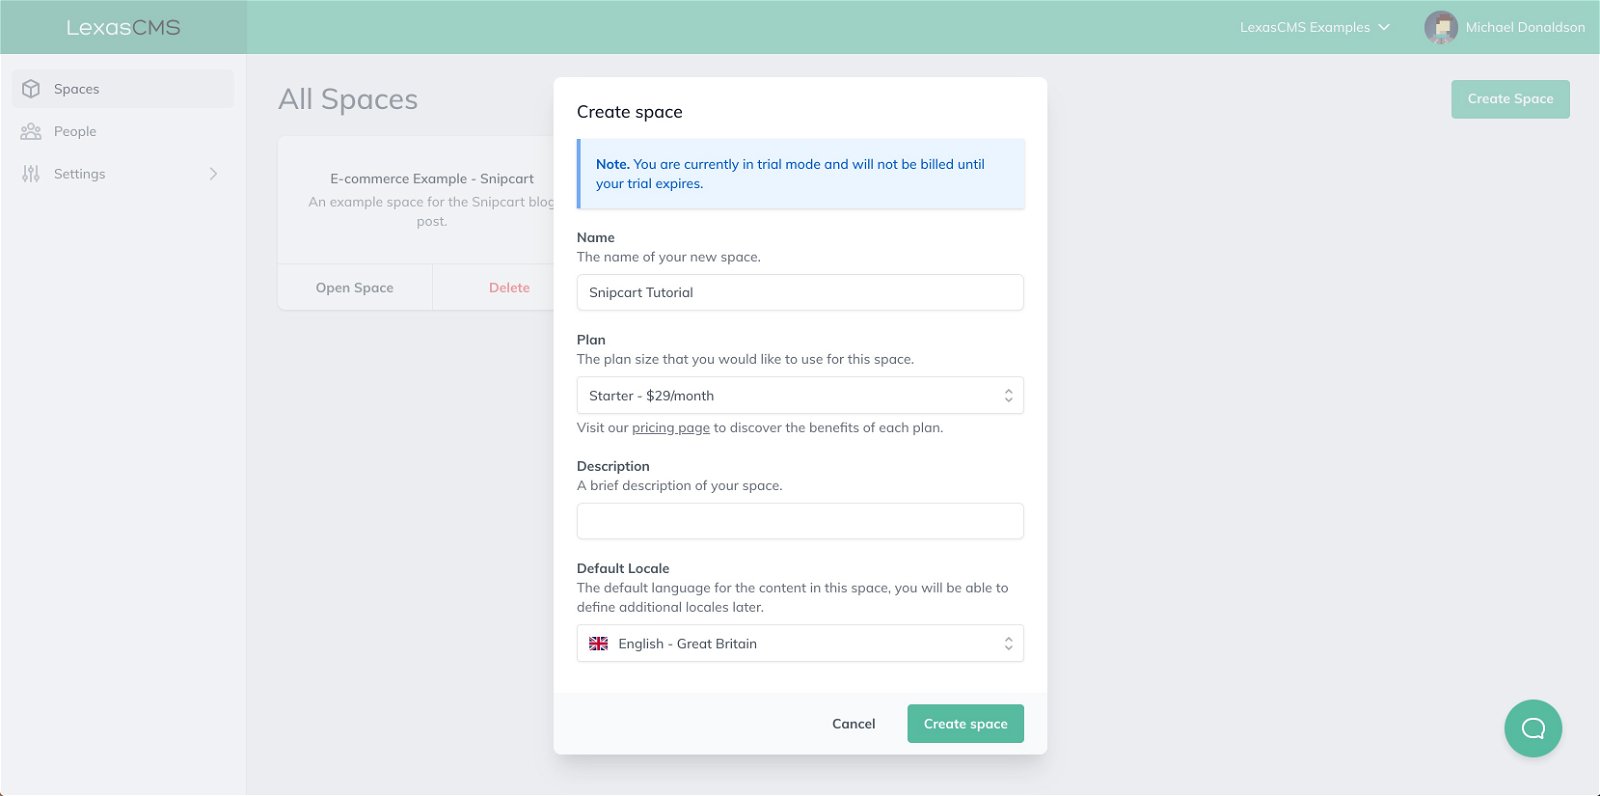
From within your organization, create a new space by clicking on the Create Space button and filling out the required information. When choosing a plan type, please select Starter or above, as the hobby plan does not have access to LexasCMS’s personalization features.
Once your new space has been created, open it, and you should be presented with a Select Starter Template modal.
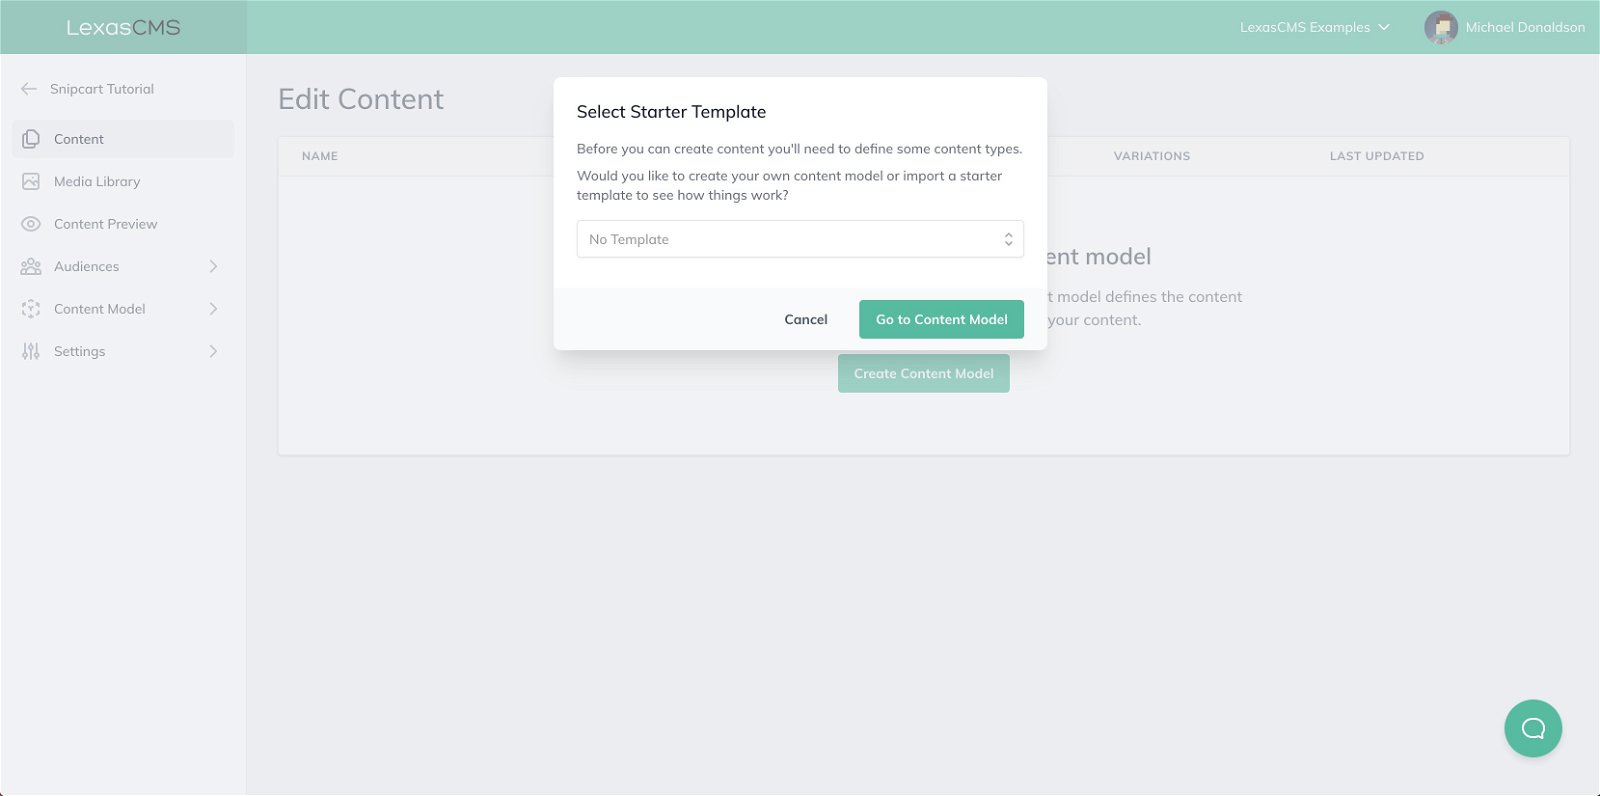
Go ahead and select the ‘E-commerce Tutorial (Snipcart)’ template.
To save you the trouble of doing it yourself, this template will automatically create all of the content types and sample content that you will need to complete this tutorial.
For those interested in what exactly the template created, feel free to browse around the Content and Content Model sections of your space.
Step 2: Create a new Next.js project
Next up, we’re going to create a new project based on Next.js. You can do so by running the following command in your terminal.
yarn create next-app lexascms-snipcart-tutorial
This command will create your new project and install its dependencies within a directory named lexascms-snipcart-tutorial.
Once it has finished, navigate into your new project directory and start your development server using the commands shown below.
cd lexascms-snipcart-tutorial
yarn run dev
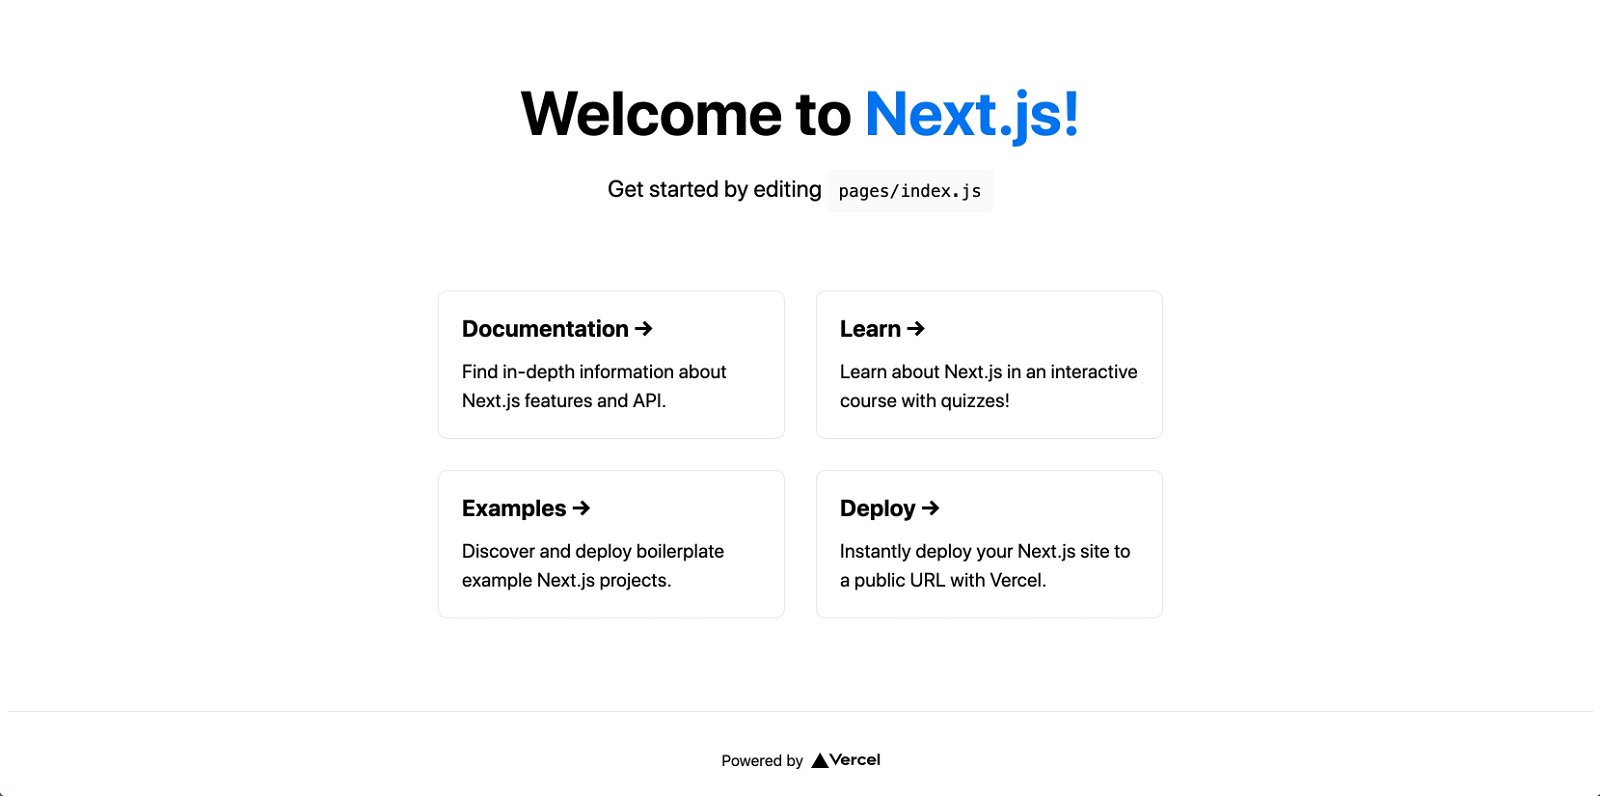
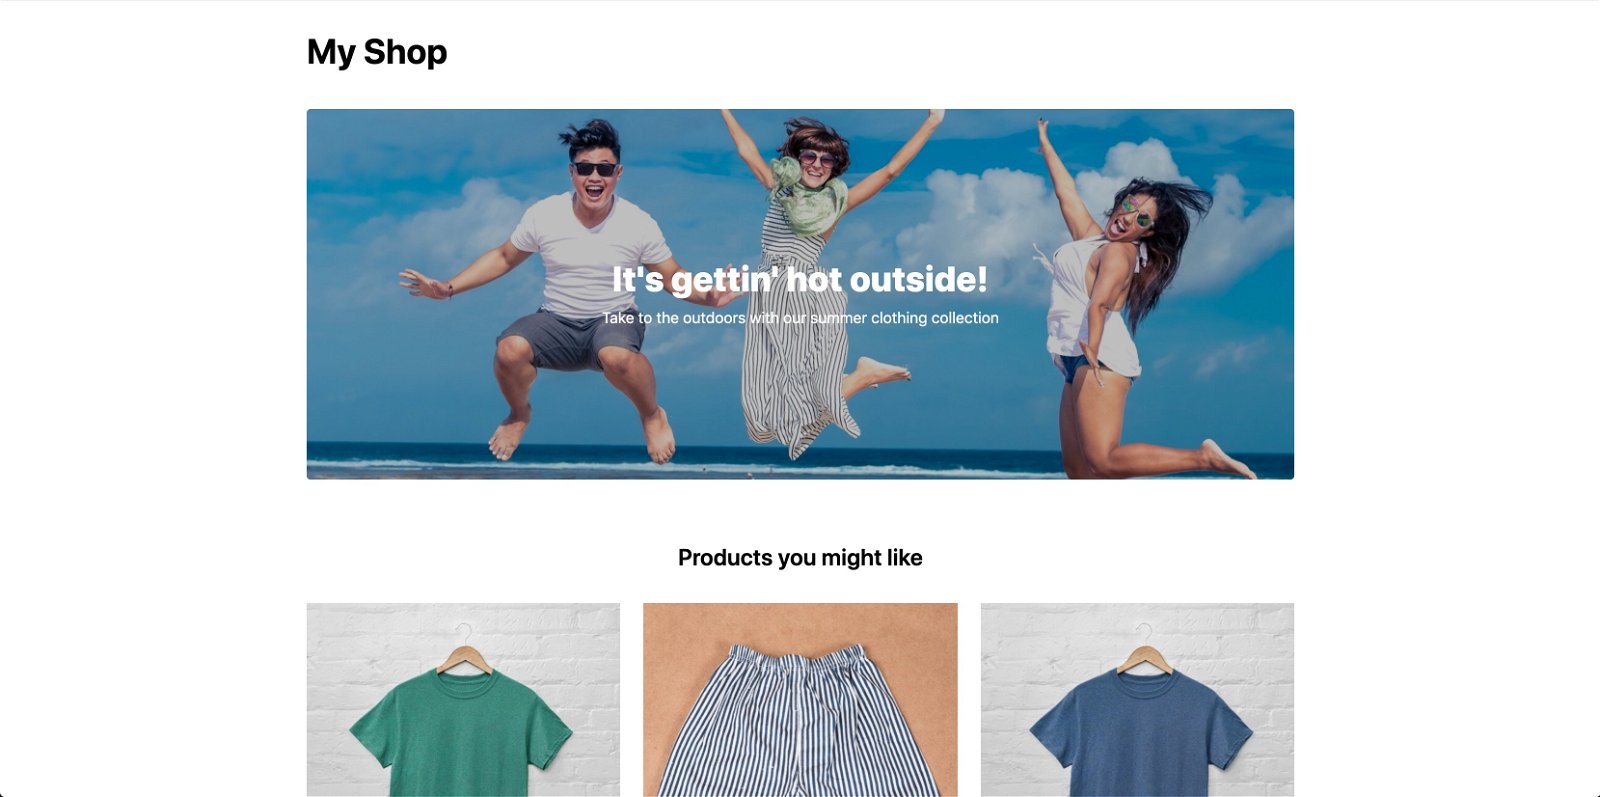
After your development server is up and running, navigate to http://localhost:3000 in your web browser, and you should see something like the below screenshot.
Step 3: Install and configure TailwindCSS
Nobody likes to look at an ugly website, so for the sake of your eyes, we’re going to install TailwindCSS.
If you haven’t used TailwindCSS before, you should definitely check it out! It’s an awesome utility-first CSS framework that was created by Adam Wathan and Steve Schoger.
Since TailwindCSS is actually a PostCSS plugin, we’ll also need to install that as well.
Install both modules by running the following command from the root of your project directory:
yarn add --dev postcss tailwindcss
Next, you’ll need to configure PostCSS to use the TailwindCSS plugin. You can do this by creating a file named postcss.config.js in the root of your project directory with the following contents:
module.exports = {
  plugins: [ 'tailwindcss' ]
};
Finally, open the styles/global.css file, and replace its content with the following:
@tailwind base;
@tailwind components;
@tailwind utilities;
Step 4: Create LexasCMS helper
Before we start creating our store, we’ll need to create a helper which will be used to fetch content from LexasCMS using its GraphQL based Content Delivery API.
Let’s start by installing some dependencies:
yarn add graphql graphql-request base-64
Create a new file named lib/lexascms.js with the following contents:
import Base64 from 'base-64';
import { GraphQLClient } from "graphql-request";

export function request({ query, variables, requestContext }) {
  // Define space ID
  const spaceId = 'YOUR_LEXASCMS_SPACE_ID';
  // Define API key
  const apiKey = null;
  // Define headers
  const headers = {};
  // Add Authorization header if required
  if (apiKey !== null) {
    headers['Authorization'] = `Bearer ${apiKey}`;
  }
  // Handle LexasCMS request context
  if (requestContext !== undefined) {
    let lexascmsRequestContext = requestContext;
    if (typeof lexascmsRequestContext !== 'string') {
      lexascmsRequestContext = Base64.encode(JSON.stringify(requestContext));
    }
    headers['x-lexascms-context'] = lexascmsRequestContext;
  }
  // Create client
  const client = new GraphQLClient(`https://${spaceId}.spaces.lexascms.com/delivery/graphql`);
  // Send request
  return client.request(query, variables, headers);
}
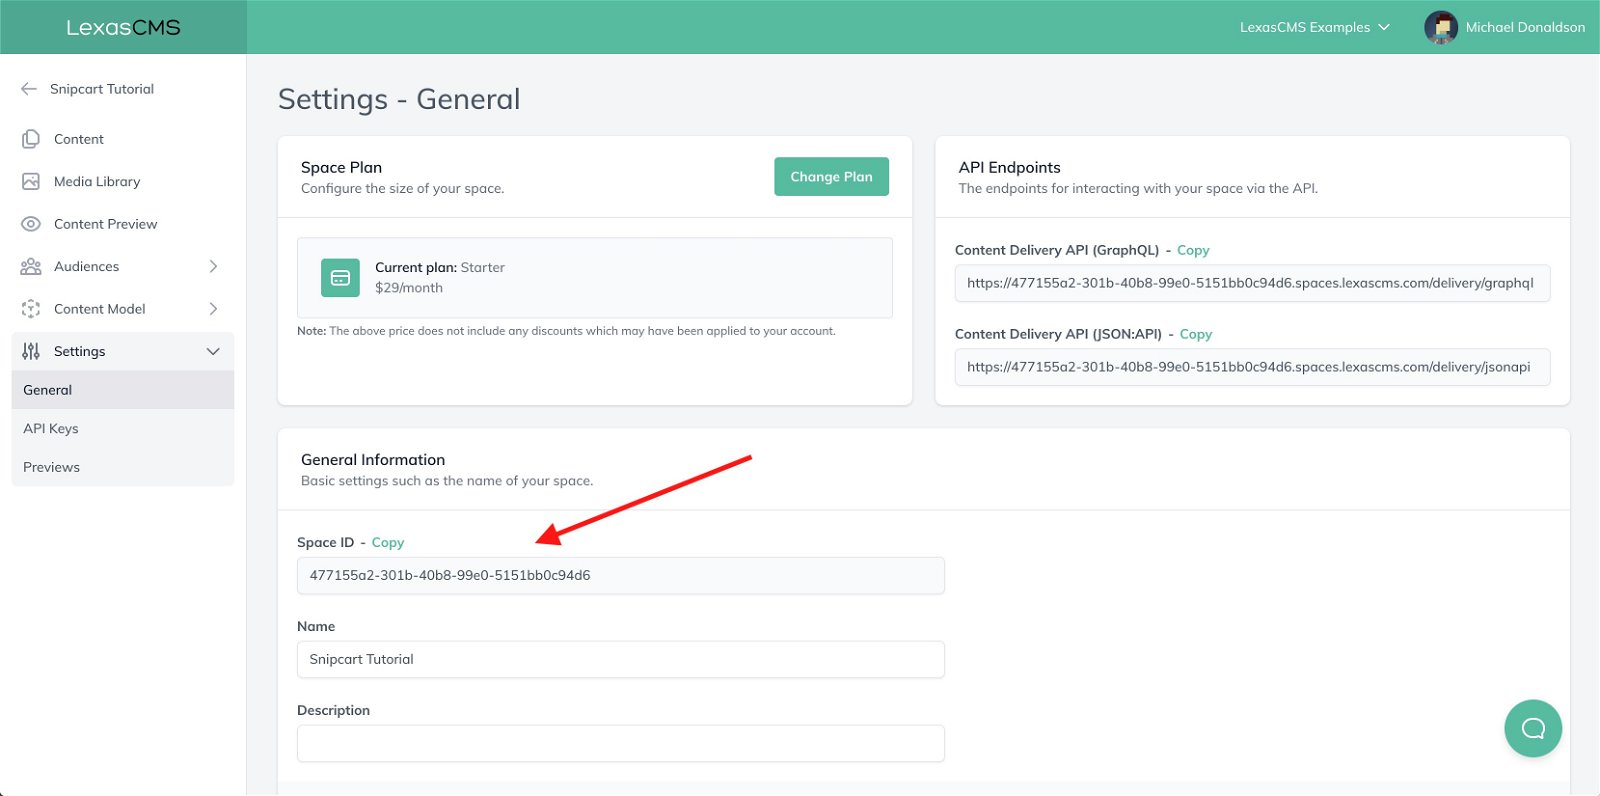
Still, in the lib/lexascms.js file, replace YOUR_LEXASCMS_SPACE_ID with your actual space ID, which can be retrieved from the Settings > General section of your space control panel.
Note: To keep things simple, we’re just hardcoding the space ID. In a real-world project, you would most likely want to retrieve this value from a pre-configured environment variable.
Step 5: Create a homepage
We’re going to start by creating a layout component. This component will wrap every page in our project to include common elements such as headers and footers.
Create a new file at components/layout.js and inside it paste the following:
import Link from 'next/link';

export default function Layout({ children }) {
  return (
    <>
      <div className="px-5">
        <div className="max-w-screen-lg mx-auto pt-8 pb-16">
          <div className="flex items-center justify-between mb-10">
            <h1 className="text-4xl font-bold">
              <Link href="/">My Shop</Link>
            </h1>
          </div>

          {children}
        </div>
      </div>
    </>
  )
}
Next, navigate to the pages/index.js file and replace its contents with the following:
import Link from 'next/link';

import Layout from '../components/layout';
import { request } from '../lib/lexascms';

export default function Home({ homepage }) {
  return (
    <Layout>
      <div className="flex flex-col gap-2 items-center justify-center bg-gray-200 text-white h-96 rounded bg-cover bg-center" style={{backgroundImage:`linear-gradient(0deg, rgba(0,0,0,0.25), rgba(0,0,0,0.25)), url(${homepage.promoBanner.backgroundImage.url})`}}>
        <h2 className="font-extrabold text-4xl">{homepage.promoBanner.heading}</h2>
        <p>{homepage.promoBanner.subHeading}</p>
      </div>

      <h2 className="font-semibold text-2xl text-center mt-16">Products you might like</h2>

      <div className="grid sm:grid-cols-3 gap-6 mt-8">
        {homepage.featuredProducts.items.map(product => (
          <div key={product.id}>
            <Link href={`/products/${product.slug}`}>
              <a><img src={product.image.url} alt={`${product.name} Thumbnail`} /></a>
            </Link>
            <div className="flex flex-col">
              <div className="flex items-center justify-between mt-3 mb-2">
                <h4 className="font-medium">{product.name}</h4>
                ${product.price}
              </div>
              <p className="text-gray-500">{product.description}</p>
              <button type="button"
                      className="h-11 bg-gray-900 hover:bg-gray-800 text-white uppercase text-xs tracking-wide font-bold rounded mt-4 transition-colors duration-150 ease-in-out">
                Add to basket
              </button>
            </div>
          </div>
        ))}
      </div>
    </Layout>
  )
}

export async function getServerSideProps() {
  // Define homepage query
  const homepageQuery = `{
    homepageCollection(limit: 1) {
      items {
        promoBanner {
          heading
          subHeading
          backgroundImage {
            url
          }
        }
        featuredProducts {
          items {
            id
            slug
            name
            price
            description
            image {
              url
            }
          }
        }
      }
    }
  }`;
  // Fetch homepage content
  const result = await request({ query: homepageQuery });
  // Return
  return {
    props: {
      homepage: result.homepageCollection.items[0]
    }
  };
}
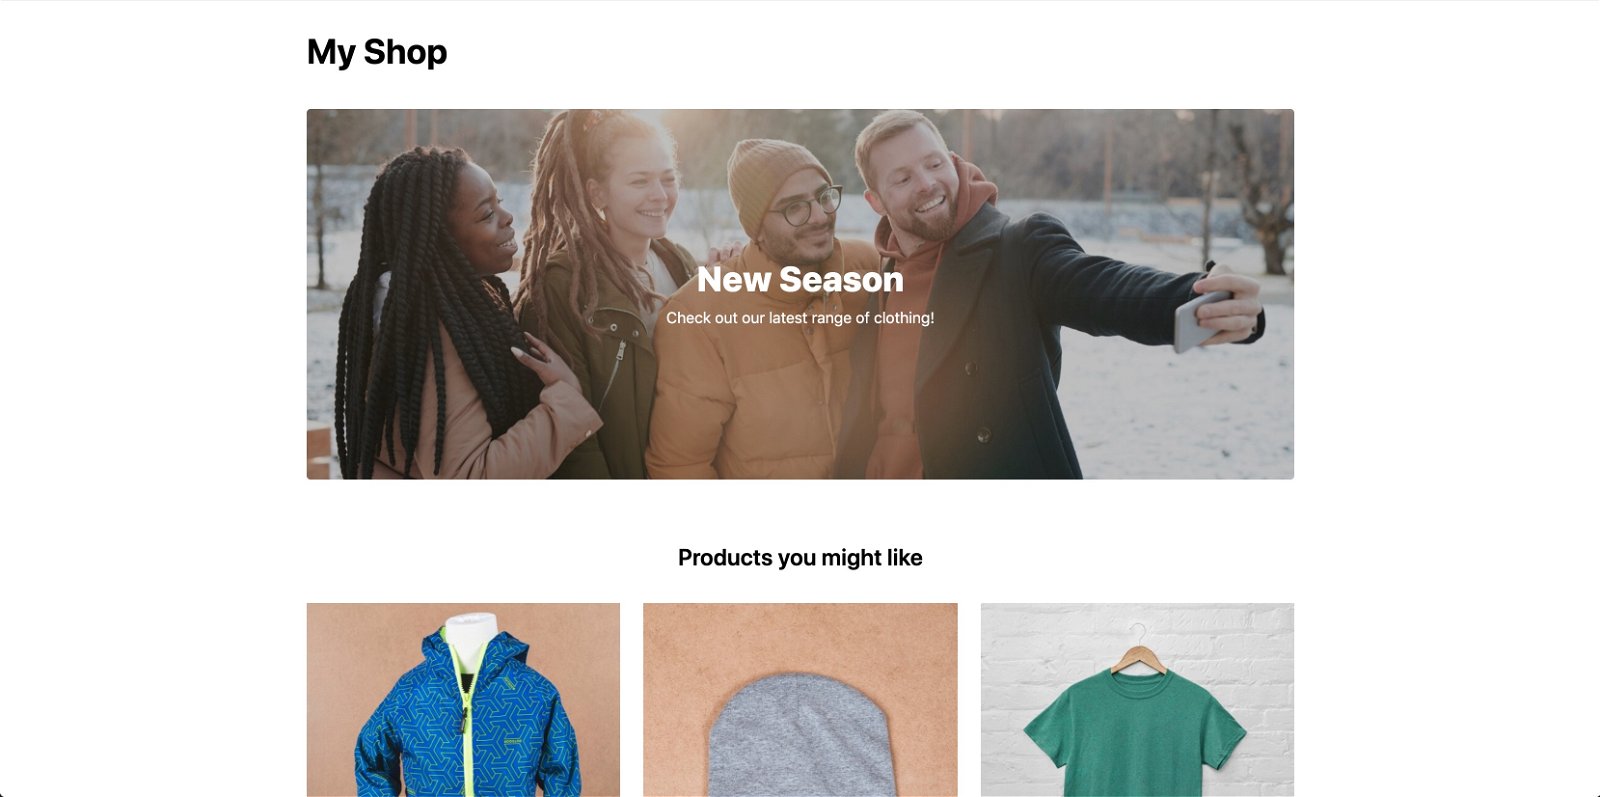
By exporting the getServerSideProps function, we’re telling Next.js that we would like this page to be rendered on the server as opposed to being statically generated.
After saving your changes, restart your development server, and the homepage of your project should look something like this:
Step 6: Create a product page
Next up, we’re going to create a product page. Since product pages are not typically personalized, we can statically generate them to improve performance.
Create a new file called pages/products/[slug].js and paste in the following contents:
import Layout from '../../components/layout';
import { request } from '../../lib/lexascms';

export default function Product({ product }) {
  return (
    <Layout>
      <div className="grid sm:grid-cols-2 gap-6">
        <img src={product.image.url} alt={`${product.name} Image`} />
        <div>
          <h1 className="font-medium text-2xl">{product.name}</h1>
          <div className="font-medium text-xl text-gray-600 my-2">
            ${product.price}
          </div>
          <p className="text-gray-500">{product.description}</p>
          <button type="button"
                  className="w-full h-11 bg-gray-900 hover:bg-gray-800 text-white uppercase text-xs tracking-wide font-bold rounded mt-4 transition-colors duration-150 ease-in-out">
            Add to basket
          </button>
        </div>
      </div>
    </Layout>
  )
}

export async function getStaticPaths() {
  // Define product slugs query
  const productSlugsQuery = `{
    productCollection {
      items {
        slug
      }
    }
  }`;
  // Fetch product slugs
  const productSlugs = await request({ query: productSlugsQuery });
  // Return
  return {
    paths: productSlugs.productCollection.items.map(product => ({
      params: {
        slug: product.slug
      }
    })),
    fallback: false
  };
}

export async function getStaticProps({ params }) {
  // Define product query
  const productQuery = `{
    productCollection(filter: { slug: { _eq: "${params.slug}" } }) {
      items {
        id
        slug
        name
        price
        description
        image {
          url
        }
      }
    }
  }`;
  // Fetch product data
  const product = await request({ query: productQuery });
  // Return
  return {
    props: {
      product: product.productCollection.items[0]
    }
  };
}
This time we’re exporting the getStaticPaths and getStaticProps functions, which tells Next.js that we want this route to be statically generated.
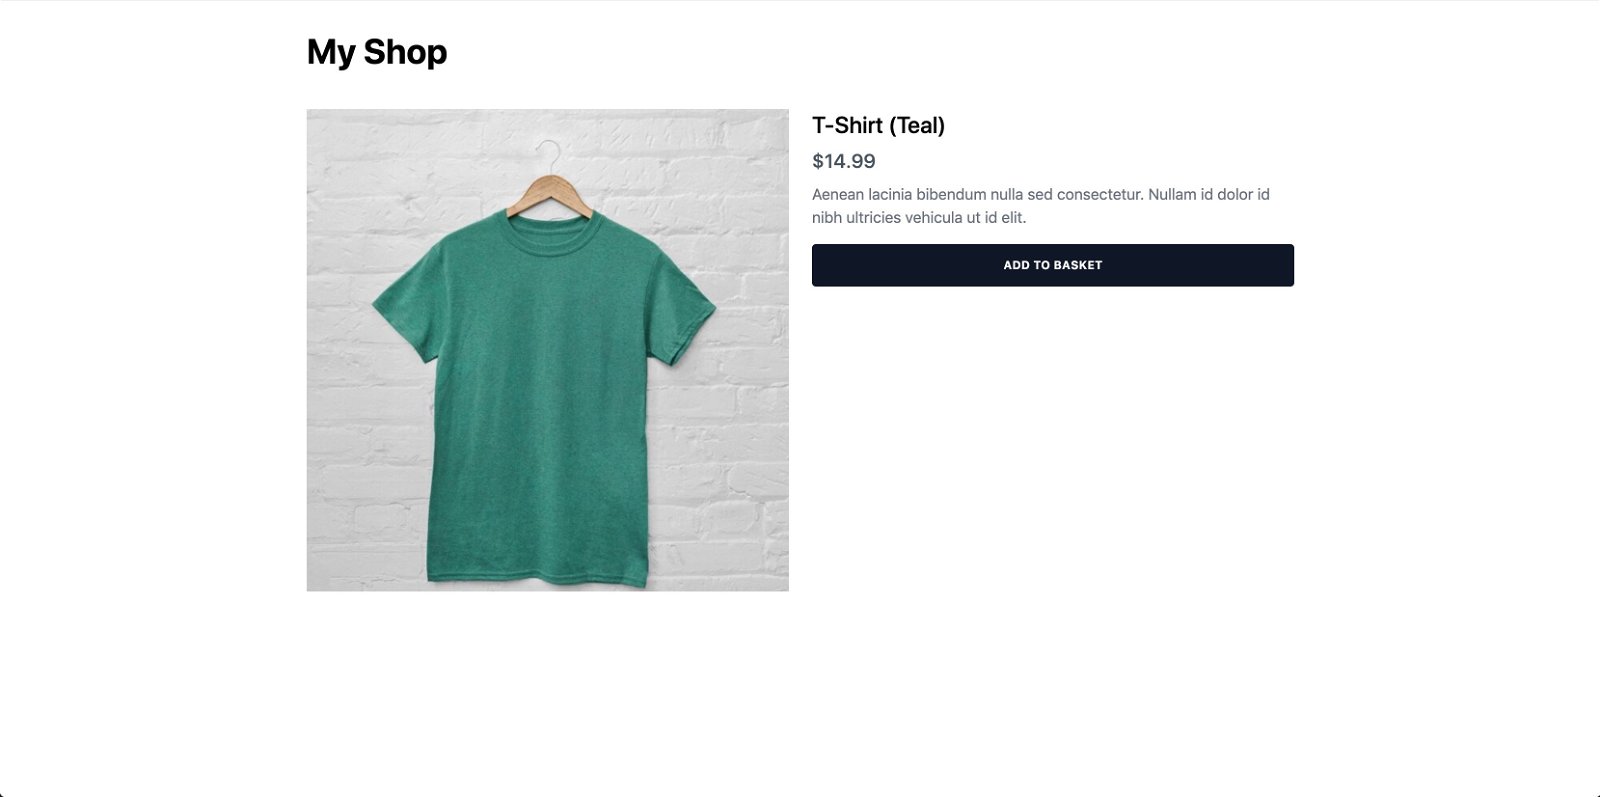
After saving your changes again, go back to your browser and click on one of the product thumbnails to open the product page.
Depending on which product you selected, you should see something like this:
Step 7: Implement personalization in the headless CMS
Now that you have a basic e-commerce store, we’re going to personalize the homepage!
To keep things simple, we’ll base the personalization on the value of a query parameter. However, in a real-world project, you would likely base it on data from a more realistic source such as profile information, order history, or even data fetched from third-party APIs.
When using LexasCMS, personalization is handled entirely by its Content Delivery API. This keeps your application code simple and ensures that content teams are free to experiment without the need for developers to make code changes.
As a simple example, we’re going to adjust the homepage banner and its featured products based on the visitor’s local temperature.
Step 7.1: Create an Audience Attribute
Audience attributes are the characteristics that are used to segment your visitors into any of your defined audiences.
Head back into LexasCMS and navigate to the Audiences > Attributes section. Once there, click on the Create Attribute button and create an attribute with the following values.
- Name: Local Temperature
- Key: localTemperature
- Type: Number

Step 7.2: Create an Audience
Audiences allow you to segment visitors based on custom rules and conditions which you define. The rules and conditions themselves are defined using audience attributes.
We’re going to create a new audience that will only include visitors whose local temperature is greater than 20°C.
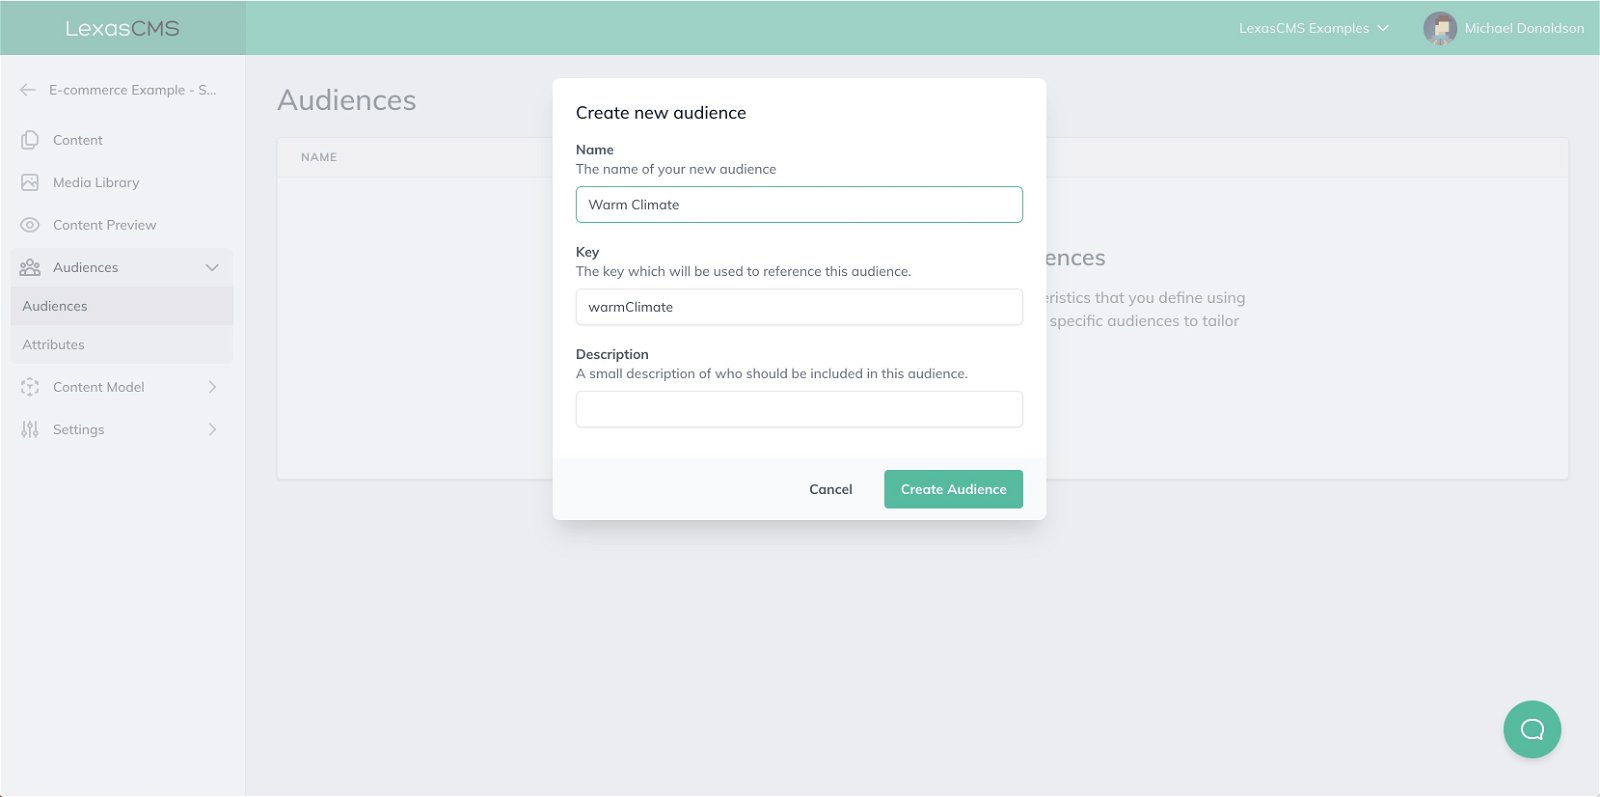
Navigate to the Audiences > Audiences section and then click on the Create Audience button. Create an audience with the following values:
- Name: Warm Climate
- Key: warmClimate
Step 7.3: Configure your Audience’s conditions
After creating your audience, you’ll be taken to the Edit Audience screen. This is where you define the rules and conditions which determine whether or not a visitor should be included within this audience.
Add an Attribute condition by clicking the Add Condition button.
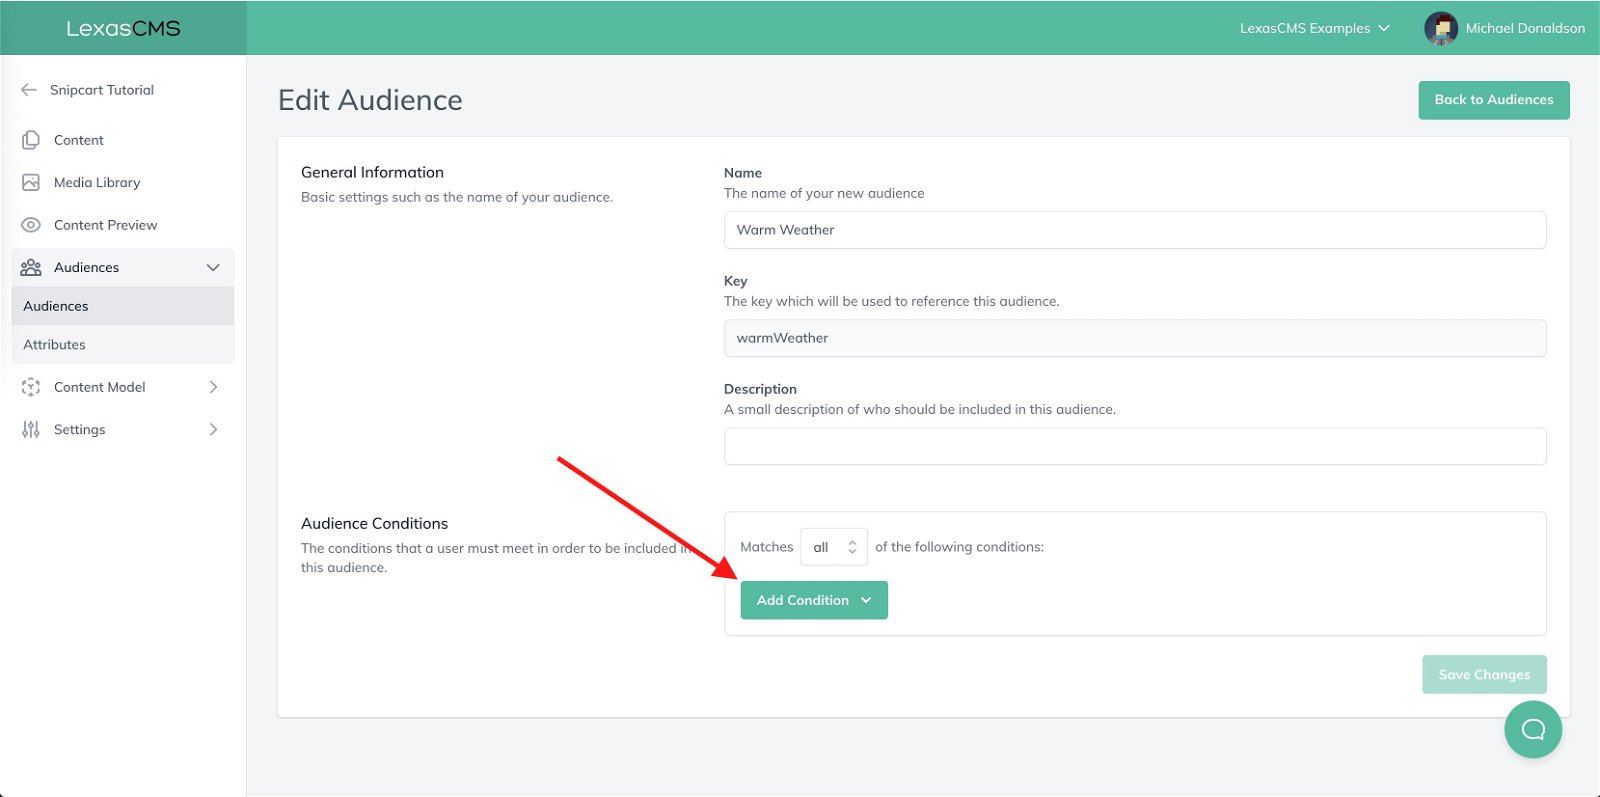
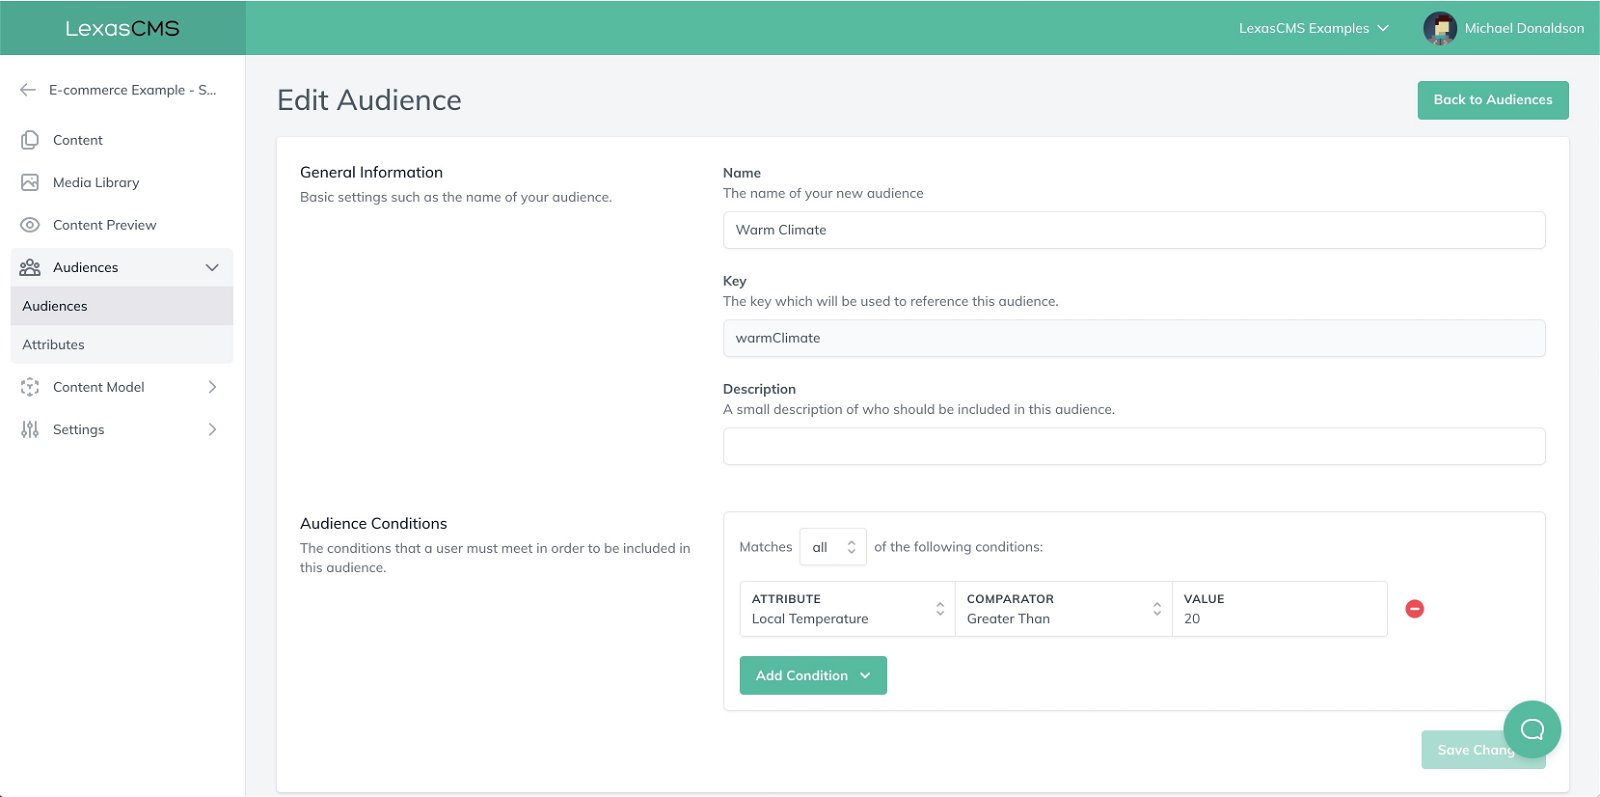
Once the condition has been added, select the Local Temperature attribute which you created earlier, change the comparator to Greater Than, and enter 20 in the Value field.
Click the Save Changes button, and your audience should now look something like this:
Step 7.4: Target your new audience with a variation
Navigate to the Content section and locate the existing content item named Homepage.
Within the item, you’ll notice that there are two variations. One of which is currently a draft named Warm Climate and the other named Default, which is already published.
- Default is the variation that is currently being displayed in your project
- Warm Climate is the variation we’re going to target members of our newly created audience
Click on the Warm Climate variation to open it, and then look in the sidebar on the right of the screen for an Audience heading. This tells you which audience the variation is currently assigned to. Since one is yet to be assigned, there will be an Add Audience link instead.
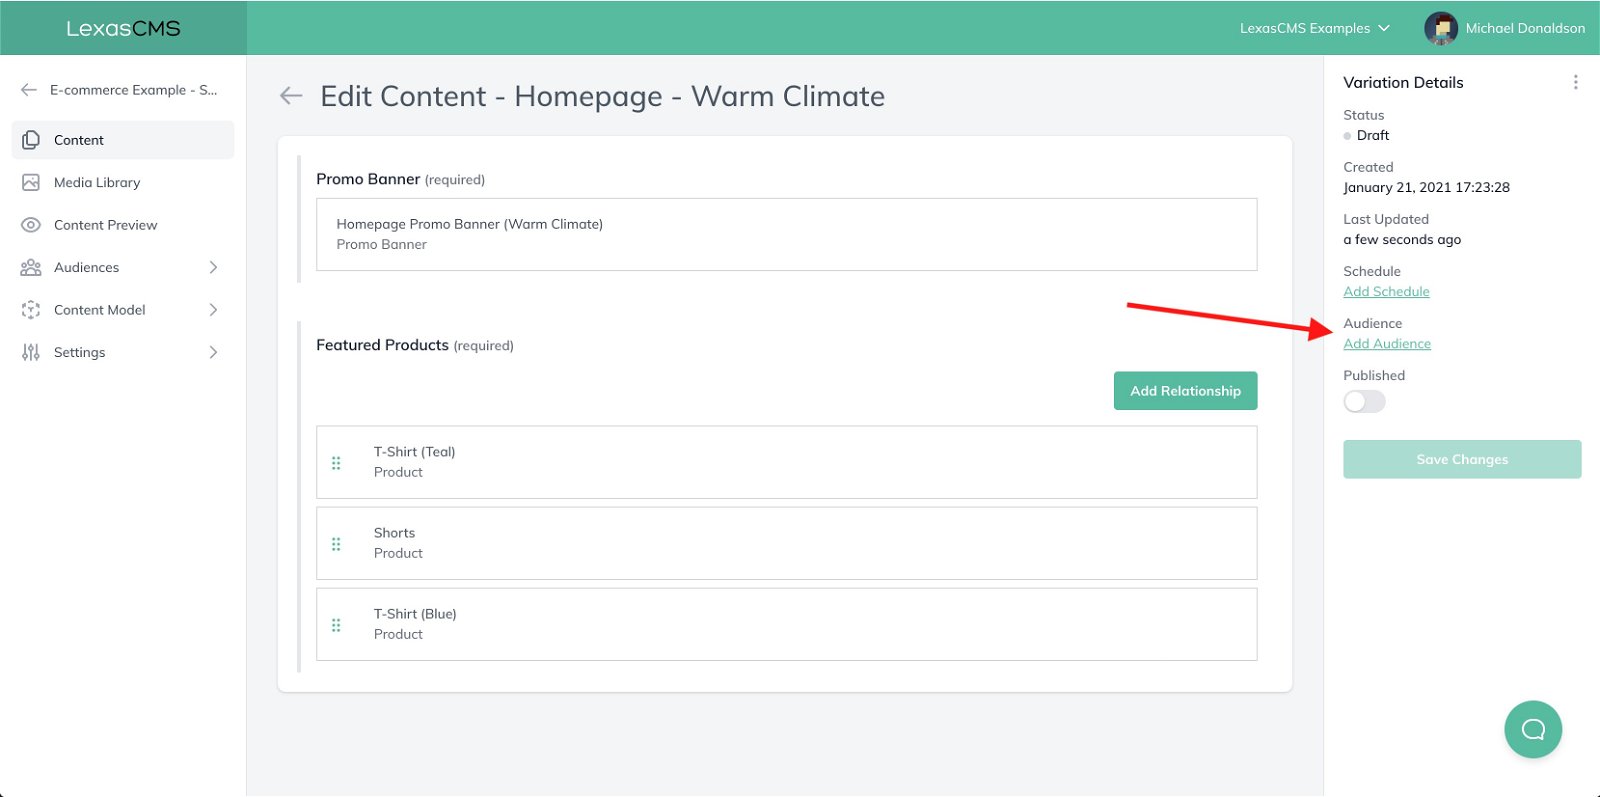
Click the Add Audience link to reveal the Update Audience modal and then select the Warm Climate audience which you created earlier.
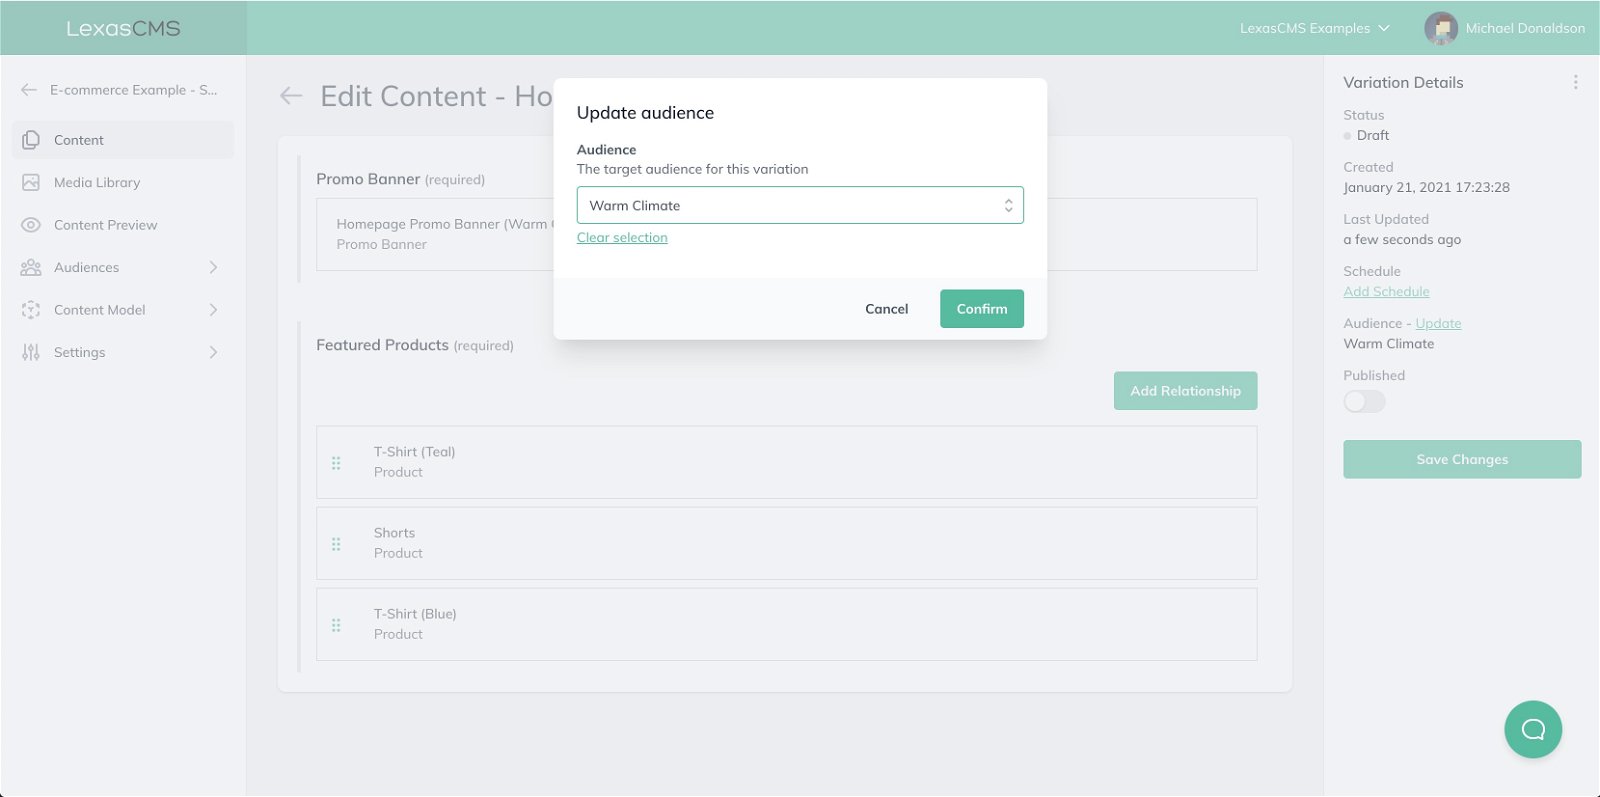
Click the Confirm button to apply your selection.
Once a variation has been assigned to an audience, it will only be delivered to visitors whose characteristics match the defined rules and conditions for the assigned audience.
Step 7.7: Publish your new variation
Now that your audience has been assigned to the variation enable the Published toggle and click the Save Changes button.
Step 7.8: Personalize your homepage
In your code editor, open your pages/index.js file and update the getServerSideProps function declaration to include { query } as the first argument.
Your function blueprint should then look something like this:
export async function getServerSideProps({ query }) {
  // ...
}
Next, find the call to request within your getServerSideProps function, and update it to look like this:
export async function getServerSideProps({ query }) {

  // ...

  // Define request context
  let requestContext = {
    audienceAttributes: {
      localTemperature: query.localTemp !== undefined ? parseInt(query.localTemp, 10) : null
    }
  };
  // Fetch homepage content
  const result = await request({
    query: homepageQuery,
    requestContext
  });

  // ...

}
This takes the localTemp query parameter value and passes it as the value for your localTemperature audience attribute. The audience attributes are then sent with your query to LexasCMS’s Content Delivery API, which uses the information to determine which variations of your content should be returned.
Notice how we haven’t touched the query itself or made any changes to our templates? This is exactly what makes LexasCMS’s personalization feature, so simple to integrate and maintain since all of the heavy lifting is handled by its Content Delivery API.
Save your changes. It’s now time to see the magic happen. ✨
Go back to your browser and reload your project's homepage (http://localhost:3000/).
You should see that nothing has changed and that it looks exactly the same as it did before. This is because we haven’t provided the localTemp query parameter.
Try reloading the homepage again, but this time add the localTemp query parameter with a value which is greater than 20 (e.g. http://localhost:3000/?localTemp=25).
This time, you should notice that your homepage has changed and that it’s now displaying the content from the Warm Climate variation.
Congratulations! You just personalized your first website page using LexasCMS. 🎉
Step 8: Implement Snipcart
What good is an e-commerce website if you can’t buy anything? Fortunately, Snipcart makes it amazingly simple to turn our website into a fully functioning e-commerce store!
Start by creating a new file named pages/_document.js and paste in the below contents, be sure to replace SNIPCART_API_KEY with your Snipcart’s API Key.
import Document, { Html, Head, Main, NextScript } from 'next/document'

class MyDocument extends Document {
  render() {
    return (
      <Html>
        <Head>
          <link rel="preconnect" href="https://app.snipcart.com" />
          <link rel="preconnect" href="https://cdn.snipcart.com" />
          <link rel="stylesheet" href="https://cdn.snipcart.com/themes/v3.0.27/default/snipcart.css" />
        </Head>
        <body>
          <Main />

          <script async src="https://cdn.snipcart.com/themes/v3.0.27/default/snipcart.js"></script>
          <div hidden id="snipcart" data-api-key="SNIPCART_API_KEY"></div>
          <NextScript />
        </body>
      </Html>
    )
  }
}

export default MyDocument
This includes some external styles and scripts which Snipcart requires.
Next, open the pages/index.js file and locate the Add to Basket button within the template. Update the button so that it looks the same as the snippet below:
<button type="button"
        className="snipcart-add-item h-11 bg-gray-900 hover:bg-gray-800 text-white uppercase text-xs tracking-wide font-bold rounded mt-4 transition-colors duration-150 ease-in-out"
        data-item-id={product.id}
        data-item-price={product.price}
        data-item-url={`/products/${product.slug}`}
        data-item-description={product.description}
        data-item-image={product.image.url}
        data-item-name={product.name}>
  Add to basket
</button>
Notice that we’ve added a snipcart-add-item class and a few data attributes. Snipcart uses them to describe the product and determine its price.
Make the same changes to the Add to Basket button on your product page.
Restart your development server and then reload your project to find that the Add to Basket buttons are now functional!
Congratulations again! You now have a fully functioning and personalized e-commerce store. 🎉
Bonus: Setup visual previews
While not strictly required, being able to preview your website through your visitors' eyes is a powerful capability for content editors to wield.
Fortunately, LexasCMS’s visual preview feature provides this ability while also being pretty simple to implement.
Start by heading back into LexasCMS and navigating to the Settings > Previews section of your space.
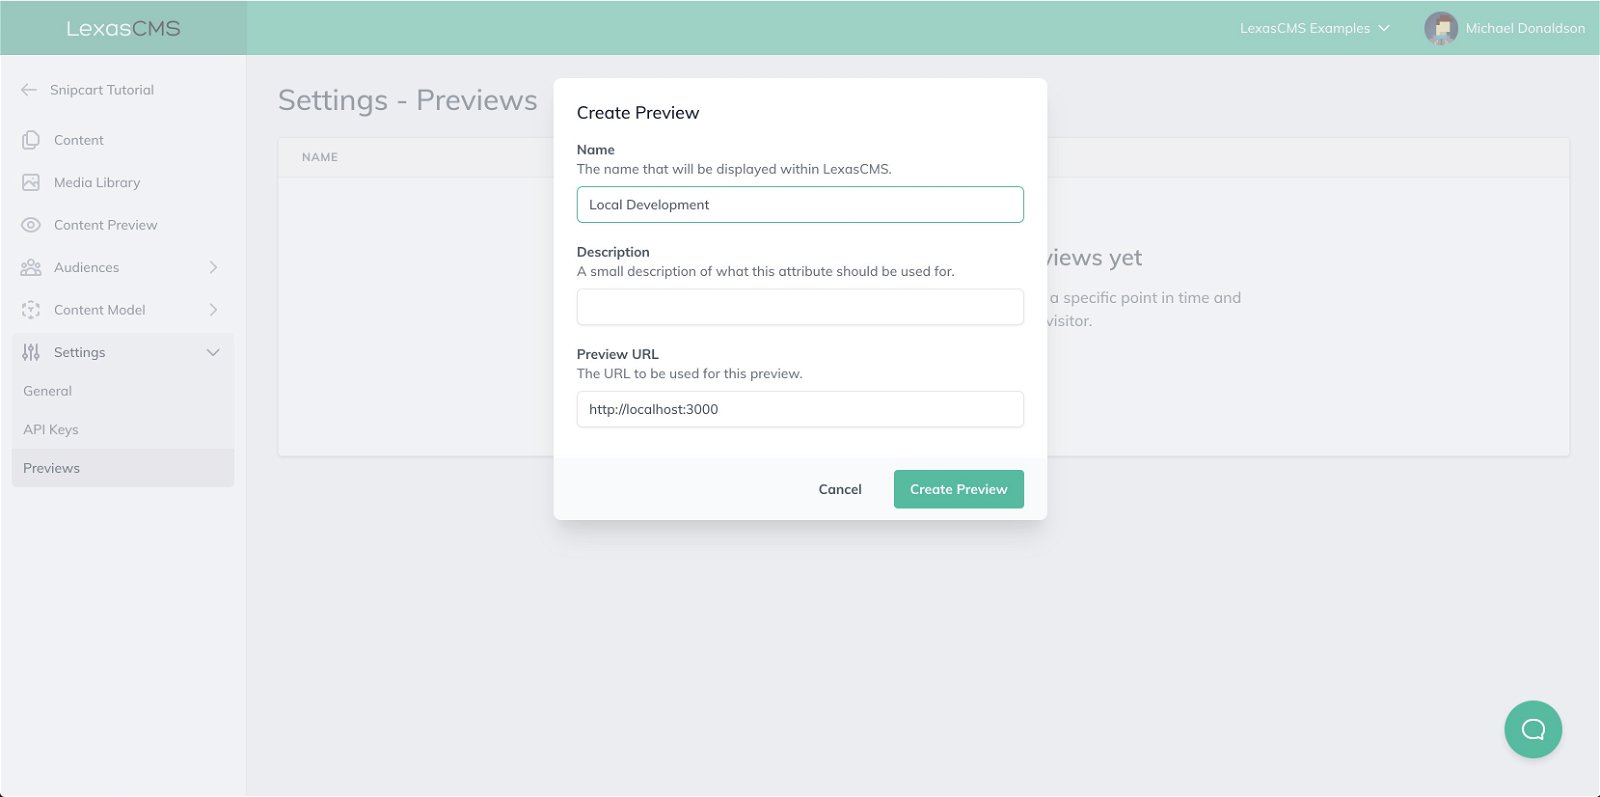
Click the Create Preview button and create a new preview with the following attributes:
- Name: Local Development
- Preview URL: http://localhost:3000
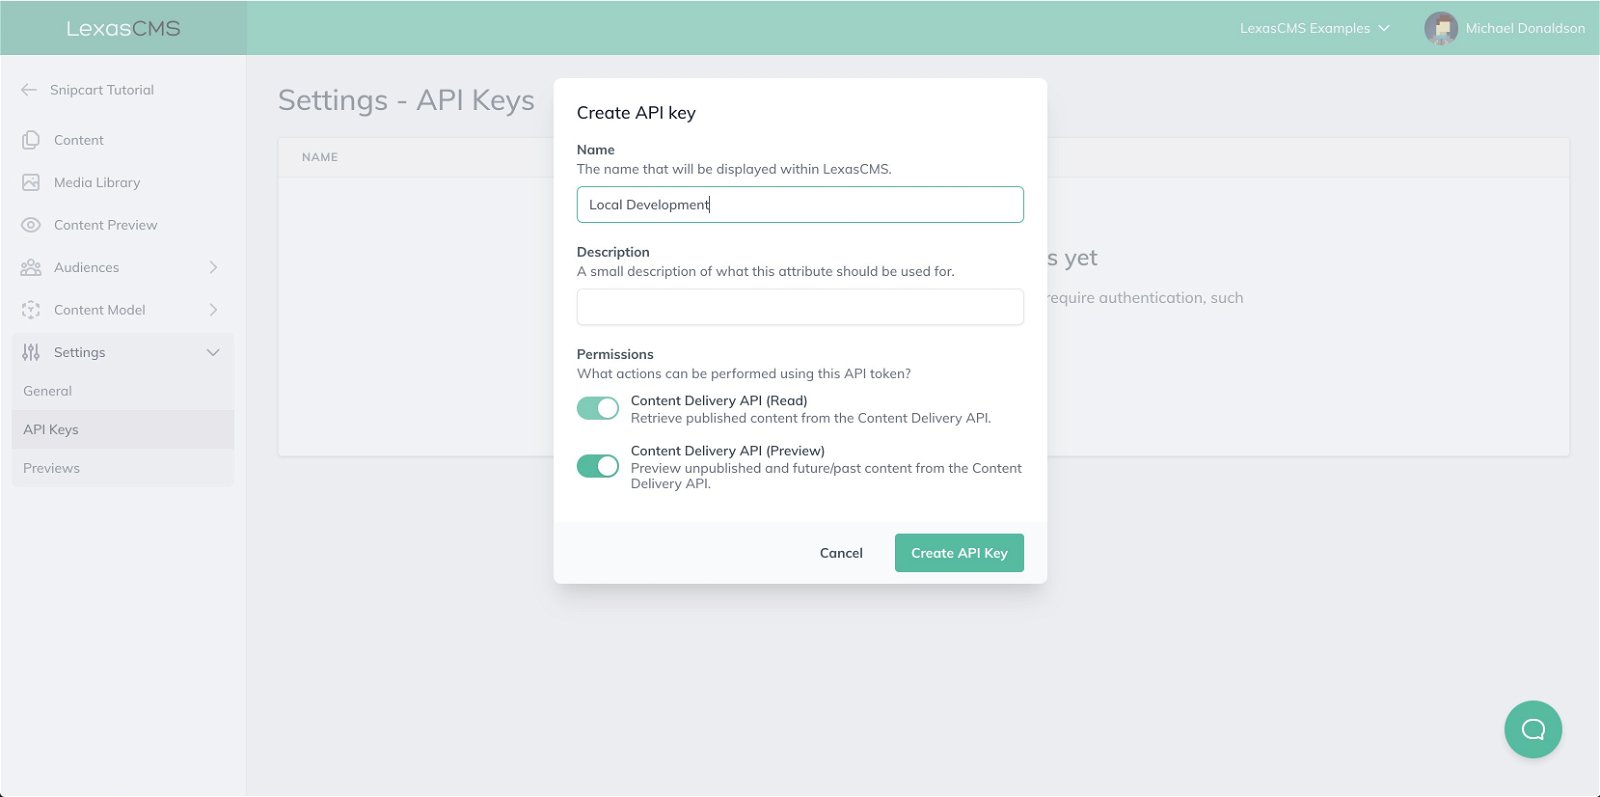
After you’ve created the preview, navigate to Settings > API Keys and click the Create an API Key button.
Create a new API key named Local Development, being sure to enable the Content Delivery API (Preview) permission.
After the API Key has been created, copy the generated token as you’ll need it in the next step.
Open the lib/lexascms.js file in your code editor and replace the value of the apiKey variable with your newly generated API Key. Like with the space ID, you would likely pull your API Key from a pre-configured environment variable in a real-world project.
Next, open the pages/_document.js file and paste the below snippet before the closing body tag.
<script type="text/javascript" defer dangerouslySetInnerHTML={{ __html: `(function(e,t){void 0!==e.addEventListener&&e.addEventListener("load",function(){var e=t.getElementsByTagName("script")[0],n=t.createElement("script")
          n.type="text/javascript",n.async=!0,n.src="https://static.lexascms.com/lexascms.js",e.parentNode.insertBefore(n,e)},!1)})(window,document)` }} />
This script allows your project to communicate with LexasCMS’s visual preview tool.
When LexasCMS loads your project within its preview tool, it provides a pre-configured request context via the lexascmsRequestContext query parameter. When this query parameter is present, you should pass its value as the request context for all requests to LexasCMS instead of building your own.
To do this, open your pages/index.js file and locate the definition of the requestContext variable within your getServerSideProps function. Replace it with the following:
export async function getServerSideProps({ query }) {

  // ...

  // Define request context
  let requestContext;
  if (query.lexascmsRequestContext !== undefined) {
    requestContext = query.lexascmsRequestContext;
  } else {
    requestContext = {
      audienceAttributes: {
        localTemperature: query.localTemp !== undefined ? parseInt(query.localTemp, 10) : null
      }
    };
  }

  // ...

}
This change will check for the existence of the lexascmsRequestContext query parameter before attempting to build its own request context.
Restart your development server, and head back into LexasCMS.
After navigating to the Content Preview section of your space, you should see your project appear within the preview window.
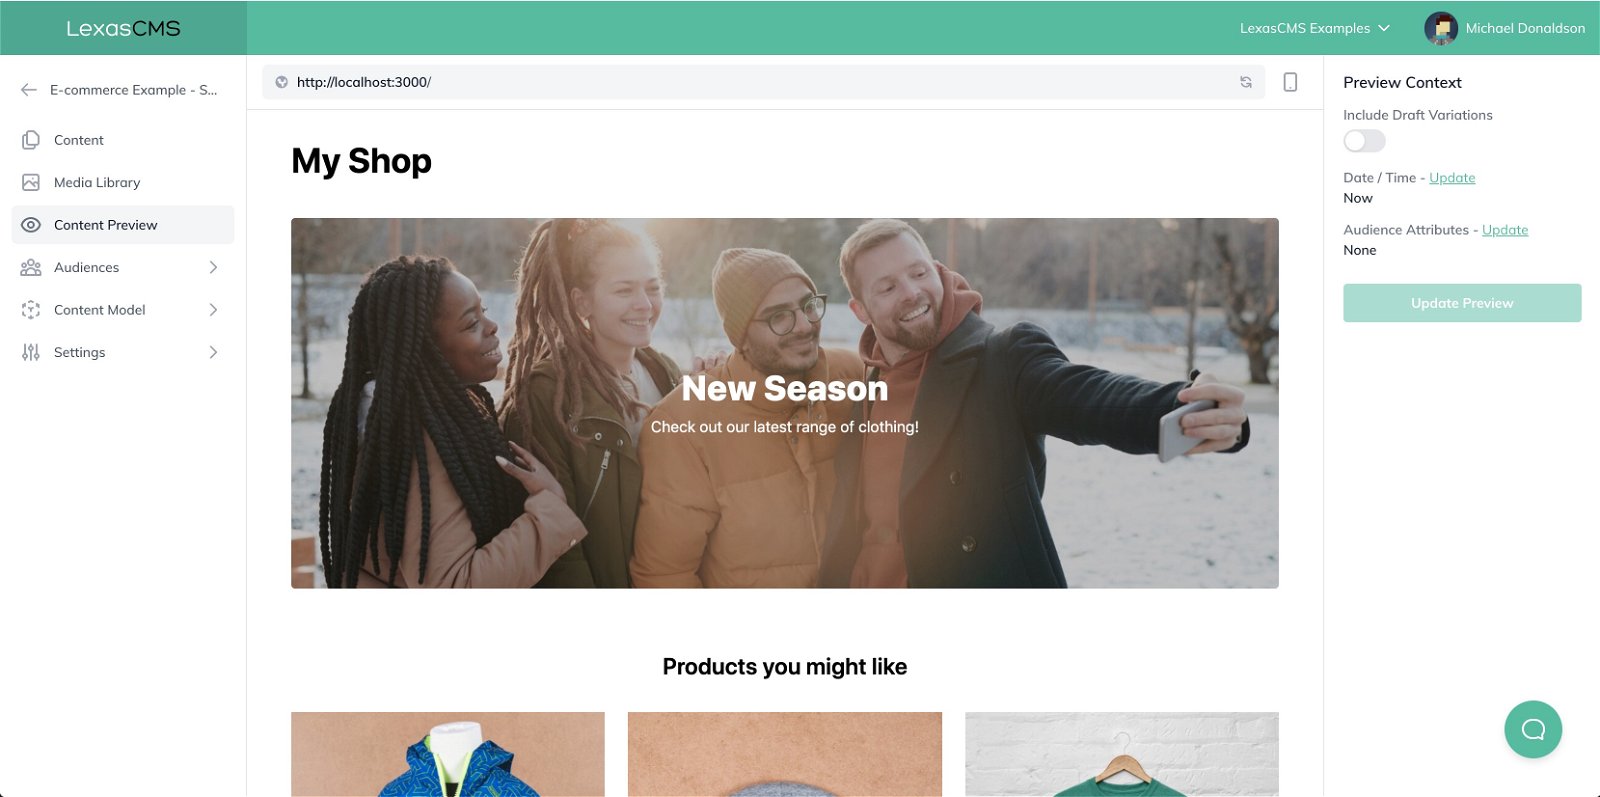
The sidebar to the right provides controls that allow you to modify the context of the preview. Let’s set the value for our Local Temperature audience attribute and see what happens.
Click the Update link next to the Audience Attributes heading to reveal the Update Audience Attributes modal.
Using the Add Attribute button in the model, add the Local Temperature attribute and set its value to 25 (or anything greater than 20).
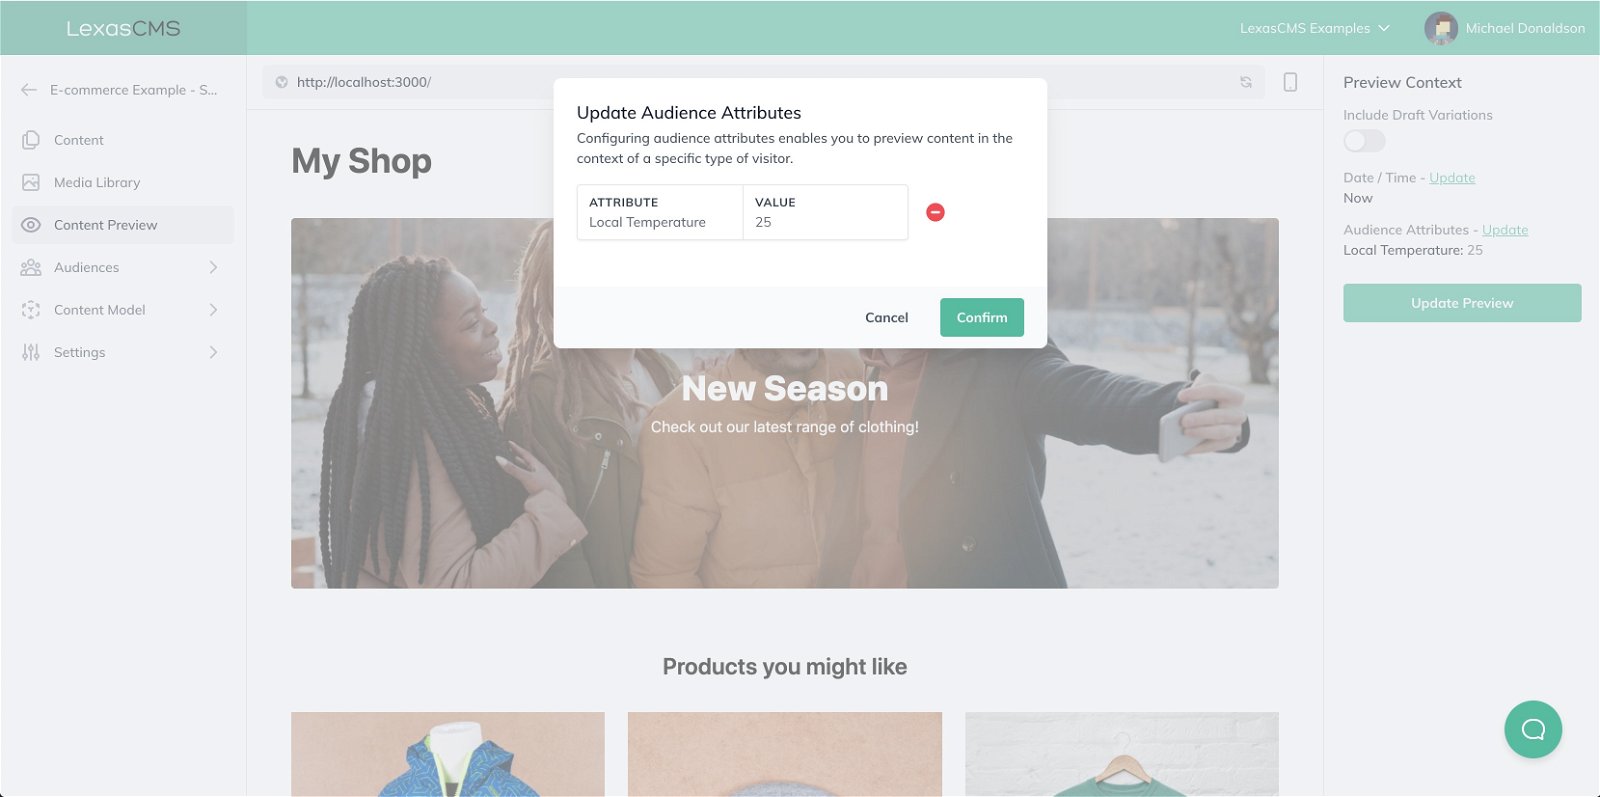
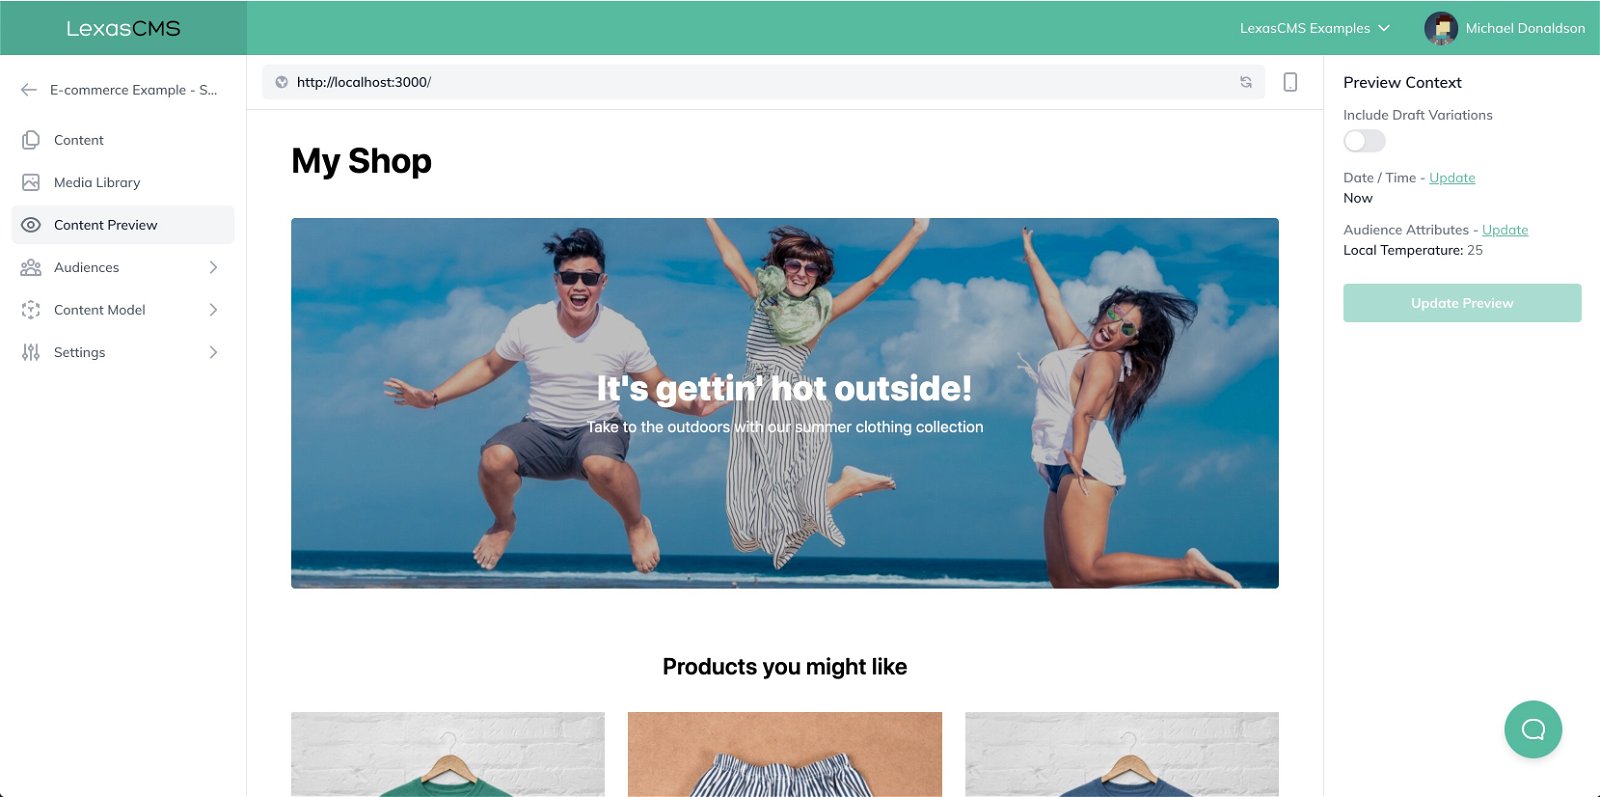
Click the Confirm button, followed by the Update Preview button in the sidebar to apply your changes.
You should see your project reload with the configured context and that the content from the Warm Climate variation is now being displayed. 🎉
Live Demo and GitHub repo
You can find a live demo of this tutorial as well as its source code using the links below:
Closing thoughts
Personalization is already a big part of the e-commerce industry, and its importance is only going to grow as time moves on.
Hopefully, this post has shown you that by using LexasCMS, you can easily create personalized websites. Websites that allow content editors to experiment freely and simplify build and maintenance for developers.
We’re only just getting started with our plans for LexasCMS, and we have tons of exciting ideas which we can’t wait to share.
To keep up with LexasCMS’s latest updates, follow us on Twitter.
Want to learn more about LexasCMS? Try it for free by creating an account and starting your trial today.
Any questions or feedback? Tweet at us or email us to let us know!
Want to see more articles like this?
Subscribe to our mailing list to be kept up to date with our latest content.
Michael Donaldson


